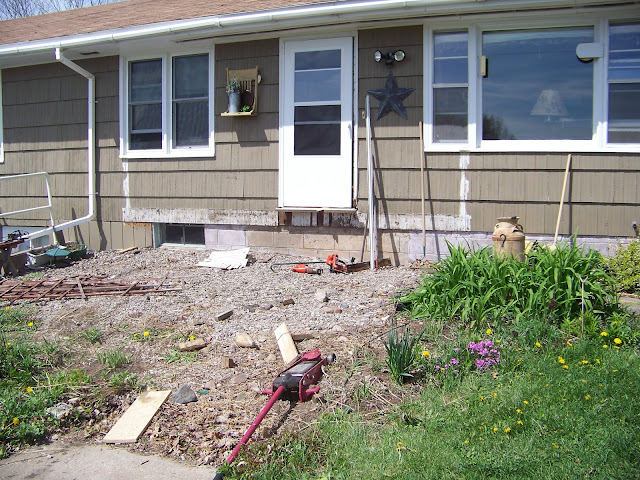
I've recently extended my trash to treasure projects beyond just decorating. In some ways it's decorating because it has everything to do with the curb appeal of my home. And it has everything to do with how I feel about my house.
When we purchased our house, it had this 12 by 16 foot deck on the front. It had nothing special about it. The railings were plain and it functioned mostly as a means of getting us into the front door.
As you can see, our home is a little unusual. It was once a church with an attached parsonage. But I think the deck on the front really kept the ranch part looking like it belonged in a past decade.We seldom sat on the deck because it offered no privacy from the cars going by or the gas station just kitty-corner to us. So all winter I shoveled snow off it and put chairs out for looks in the summer. But since it's on the south side, the sun baked us and the yellow jackets wouldn't leave us alone on the few occasions we tried sitting out there.
This spring, when I was longing for something in the back yard where we had just a plain cement steps, I came up with the brainy idea of recycling our deck by taking it down and using the lumber to build a deck on the back side.
Kinda plain. And no place to sit and enjoy the shade.
So, I talked my handy hubby into tearing off the front deck to recycle it for the back.
Lovely, huh? This is what happens when a wife gets a bright idea. The next challenge was to figure out how to build a smaller replacement "deck" and connect it to the sidewalk while also managing the slope.
I designed the brick part and my hubby helped get it all installed. The above photo was when it was 90% finished. All it needed was the hand rails.
All done! We bought new treated lumber for this project. (BTW, I took the picture at dusk and the weird glow by the door is the security light). Now, for the recycled deck in the back.
First, my hubby started framing it in.
 We decided to leave the existing steps in place and build the new deck alongside with a small step up. Eventually, the old cement steps will get a stone facade treatment mortared on.
Before the last board was on, I started putting furniture on the deck. I couldn't wait! When the last board was on, my hubby sat down to admire his work. Or take a nap.

He flipped all the boards to the side that wasn't stained. I'll eventually stain the deck with some sort of water sealer. And we'll be rerouting that down spout so it goes under the deck as soon as we get supplies.
I'm so thrilled with both the front and the back now! And by recycling the one deck, the whole project cost less than half of what it would have. Now, I'm hoping to find some "new" patio furniture at a thrift sale. And you can see some of the stones on the right bottom corner that will eventually be fitted and mortared onto the cement steps. But, I'll let my hubby rest a little before starting that project!
I'm linking up this week to:
I'm linking up this week to:
- The Before and After Party at The Inspired Room
- Trash to Treasure Tuesday at Reinvented


What an awesome makeover!! Love both the new look on front and the deck on back--wow :o) You guys are a dynamic DIY duo!
ReplyDeleteI'm so impressed! Great idea recycling that old deck!
ReplyDeleteI love your new deck area in the back, it looks great and now you have a place to sit and relax.
ReplyDeleteLooks wonderful... don't you love it when a project turns out great.
ReplyDeleteHappy Day
Nice design! Um. . . could I borrow your hubby?
ReplyDeleteCongratulations on a job well done. Everything looks good. I thought your house looked nice before but it looks even better now. I'm always amazed when people can look at something and visualize something better and know how to get from here to there. I'm stymied when it comes to figuring out what needs to be done.
ReplyDeleteI love the new front area! Great idea to reuse the wood!
ReplyDeleteGreat idea,moving deck from front to back! What a nice improvement to the front too.
ReplyDelete