Content from this blog now appears on www.michellerayburn.com

t

10/30 Follow Friday Blog Hop

Trash to Treasure Decorating


Welcome back to Follow Friday!
"T2Tff"
Thanks for the links last week! 

What is your favorite link or site of the week? It could be your favorite project on your site, or a new site you discovered this week that you loved.  Link up and tell us what's hot in the Trash to Treasure world this week.You'll have until Sunday evening to post your links.


We can learn so much from each other! For example, I love these blocks that Lisa at Recaptured Charm featured this week. I can see some fantastic possibilities for modifying the idea for some of my trash to treasure ideas. 


This photo belongs to Lisa at Recaptured Charm

Didn't she do a great job? Now it's your turn.
 

Blog Hop guidelines:

1-Add a permalink to your specific post or the main page of your blog if you aren't showcasing a specific project. Be sure to check that the link works after you post.

2-Add a short title for your post. This could be your name or blog name if you'd like.

3- Link back to this post from your blog, or send a link to your facebook friends or tweeps (mention @trash2treas).

4-Check out the links and leave some comments on the sites you enjoy.

That's all there is to it! I can't wait to see your links and ideas. Never used MckLinky? It's super easy. You don't need an account or any software. Just click on "you are next" below and type a title for the post (or your name) and add a link to the location on the web. It's that simple!

Follow Friday Blog Hop

Door Repurposed


A Door Becomes a Coat Rack

I've always wanted one of those coat racks/hall trees that has a bench. My sister has a nice one with a mirror and it's expensive classy. Being more of a rustic decorator myself, I thought maybe I could come up with something a similar, yet reflecting my own style. When I moved into my house, this door was hiding among a stack of other stuff left behind in the basement and one day when I was dreaming about my coat rack idea, inspiration hit.

I already owned the Americana bench. I found it at a yard sale when a crafter was going out of business. To carry out my idea, I purchased some heavy duty coat hooks in the hardware department of our local home improvement store. I chose the ones that are a couple dollars each because they are nicer looking than cheap plain silver hooks. I had my husband help me attach the hooks to the door. Then I propped the bench in front of it. I didn't attach it because it makes it easier to move around.

Why do I need moveable pieces? Because I rearrange constantly! Anyone else relate to my obsession? My hubby never knows what to expect when he comes home.

Anyway, I started out with the "coat rack" just leaning up against one wall, but I thought it looked awkward there, so eventually, I came up with the idea of putting it back to back with a bookshelf. This makes a little entry area in my living room which I like. I anchored the 2 pieces together by pounding an upholstry tack into each one and then wrapping lightweight wire around both, like a toggle. Then I piled some tchotchkes and a plant on the top to disguise the height difference of the pieces.


Now I have a place to store mittens and seasonal stuff, and everything I have to hide when company comes over who knows what else. 

What have you repurposed? Get ready to share your favorite links on my Follow Friday Blog Hop!


Thrift Store Treasure, Or Is It Trash?

One of My Favorite Finds

Have you ever been in a thrift shop and had a moment where you see just the thing you know you need but you never knew you needed before? I had such a moment with my orange chair.

I was browsing the bargain tent at a local thrift store and all furniture in the tent was $5. I snagged this vinyl (Or is it leather? Who knows?) chair for five bucks. Before I purchased the chair, I did consult with my teenager who was shopping with me. He gave me a big "no" vote on the chair, but I bought it anyway. He grudgingly helped me load it into the van.

Now that you've seen it, you might cast your vote on my son's side thinking I ought to have left it in the sale tent. But if you note the burnt orange striped curtains in the background, you might have a teensy glimpse into my burnt orange chair logic. I had to have this chair!

Sure, I had to vacuum some kitty hair out of the crevices, and I haven't yet figured out how to cover the minimal kitty scratches on the front, but I washed it all with disinfectant and it's a great chair! One person's trash is my treasure.

As for the rest of the family, I think the chair is starting to grow on them.


What's your favorite thrift store find? Did the other people in your life think it was as much of a treasure as you did? Leave your story in the comments below and be sure to post a link if you have a picture of it on the web.

This post is featured on 2nd Time Around Tuesday

and on The Thrifty Home's Penny Pinching Party

 http://www.thethriftyhome.com

Follow Friday Blog Hop


Trash to Treasure Decorating


It's Follow Friday!
(
Otherwise known as T2Tff)

Link parties and blog hops are all over the place, but it's such a fun way to see everyone's ideas. My blog is only a month old, so I'm still building followers, but I thought it would still be fun to start right away with my Follow Friday blog hops. And I've had lots of blog visitors in the past few weeks. A big thanks to all my readers!

What is Follow Friday?


It's your day to share your favorite sites to follow. It could be your own. Or it could be someone else's. Link up and tell us what's hot in the Trash to Treasure world this week.You'll have until Sunday evening to post your links.


Blog Hop guidelines:

1-Add a permalink to your specific post or the main page of your blog if you aren't showcasing a specific project. Be sure to check that the link works after you post.

2-Add a short title for your post. This could be your name or blog name if you'd like.

3- Link back to this party from your blog, or send a link to your facebook friends or tweeps.

4-Check out the links and leave some comments on the sites you enjoy.

That's all there is to it! I can't wait to see your links and ideas. Never used MckLinky? It's super easy. You don't need an account or any software. Just click on "you are next" below and type a title for the post (or your name) and add a link to the location on the web. It's that simple!

What to Do with Enamelware?

Enamelware-More than Just Cookware

I love enamelware! Most of mine I've picked up from garage sales or from family members who were parting with pieces. I use mine for decoration, not for cooking. Here are a few examples of how I've used enamelware.

The white pot on the counter top is perfect for hiding cell phone chargers and other clutter. If you're wondering what the cheese grater is for, see my post about Cheese Grater Luminaries.


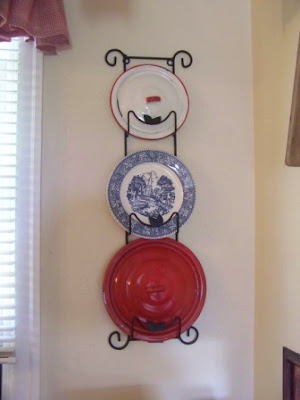
My mother-in-law had a box of enamelware lids in her basement when we cleaned it out. No pots, just lids. I've used some of them on my plate rack.


I picked up the painted pot lid at a craft show and the little black pot was a yard sale find. I hung them up in my kitchen.

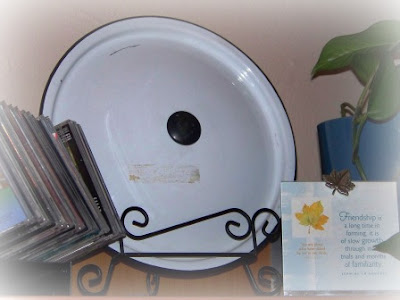
This large pot lid was perfect for a tripod plate stand. Someday, I need to clean that sticky tape residue off of it!


I use my enamelware coffee pot as a flower vase for silk flowers. If you want to use real flowers you're worried about rust, just set a glass vase inside the enamelware.
So how have you used your enamelware? Post a comment below and if you have a picture to show, leave a link to your website. And don't forget that Friday is "Follow Friday" where you can link up to your favorite post of the week.

I'm linking up today to Trash to Treasure Tuesday at Reinvented. Stop by and see the other projects.


From Door to Desk

The Practical Side of T2T

Sometimes my trash to treasure (T2T) faves are artsy or inspirational, but sometimes they're just plain practical. For me, it's about being innovative when I need a solution.

I bought this hollow core door at a yard sale thinking that it was the perfect replacement for my beat-up bathroom door. However, my memory served me wrong on the size and when I got home, I was stuck with this oak door that was 2 inches too wide. So, I put it in storage in the basement with the other flea market mistakes.

One afternoon, as I worked at my desk, was frustrated that I had no surface space for spreading books or papers. Stuff kept falling off the sides of my cheap little 48" by 23"' pressed board assembled-from-a-box desk. I dreamed of a nice big corporate sized desk until a glance at my bank account snapped me back to reality. "Make do", it said to me. But I wasn't willing to make do with the lack of space. Then I remembered the door in the basement.

I lugged it upstairs, cleared the clutter from my desktop, and laid the door on top of my existing desk. Suddenly, I had a 30 by 80 inch surface! Turns out it was worth the $10 I'd invested in it after all.

My "Door Desk"

Notice how I didn't disguise the hinge spots. I think it adds charm!

The doorknob opening makes the perfect spot to run cords through at the back edge.

Once I had my door in place, I got even more inspired and rummaged through the basement for an old armoire cabinet door that I had save for no particular reason. I propped this door on two 3-drawer plastic office organizers (one on each end) and created a side desk for a place to put even more stuff. You can't have enough office stuff, right?

Armoire door side desk

Now that I have my office set up like the way I like it, who needs a new desk? Now, what do you plan to do with an old door at your house?

I'm linking up today to Trash to Treasure Tuesday at Reinvented. Stop by and see the other projects.

A Not So Cheesy Luminary

Here's a "Grate" Idea for You!

What do you do with a rusty old cheese grater? Make a luminary.

If you've seen the rusty kitchen utensils at flea markets and yard sales, you've probably also wondered what to do with them. Many are too rusty for food grade use. I purchased my rusty cheese grater at a tag sale and the lady at the checkout stand asked what I planned to do with it. I said I planned to put a candle inside and make it a luminary for my kitchen counter. She laughed and offered to refund my quarter and keep the grater for that purpose. I kindly declined. Seriously, I'm not heartless, but a sale is a sale.

Making a cheese grater into a luminary is a simple as putting a jar under it with a tealight candle inside. It can be any sized jar as long as it fits under the grater. I tied raffia and some dried berries on mine, but make sure that the decorations are well out of way of the flame. Using a tealight assures that the flame is low and small.


If you are at all concerned about the surface getting too hot, just stand your candle jar on a piece of marble or ceramic tile.

After I made one cheesy luminary, I made a second one to stand on top of the wood pellet stove. It's a "grate" conversation piece when it isn't lit. People always want to know what the grater is for.

See this and other fun projects on Flea Market Style Magazine's "I'm a Flea Marketeer Link Party."

And also on Beautiful Life Friday at The Inspired Room.

Follow Friday Link Party

Trash to Treasure Follow Friday Link Party

Which sites do you follow?

My website is still brand new, so I'm still adding features. I'm adding a Follow Friday feature. Hey if Twitter can do a follow Friday, why not try it here? What is Follow Friday? It's where you share your favorite trash to treasure blogs and posts from the week. Use MckLinky below to upload your link to your blog, your favorite blog, or a post that my readers just have to see.

All I ask in return is that you add a link to my site somewhere on the web: on an e-mail to your friends, on your Facebook status, on your blog, or on Twitter. That's all there is to it! I can't wait to see your links and ideas. Never used MckLinky? It's super easy. You don't need an account or any software. Just type a title for the post (or your name) and add a link to the location on the web. It's that simple!

So, it's Friday, and it's late in the day because I had a speaking gig today, but there's still time, and since it's the first Follow Friday, I'll leave MckLinky open through the weekend. I'll get us started with some of my favorite sites.

Fall Pumpkin Decoration

T.P. Pumpkins

My mom and some of her friends made these cute pumpkins for a ladies fall retreat and I thought I would show you how to make them. It's an easy fall decoration that isn't messy and you can even make these with kids.

This project is not quite trash to treasure, since toilet paper isn't considered trash until it is used. But I thought it was close enough to share with my readers. It's a perfect way to use up some scraps of fabric too.

What you need:
  • Fabric square, at least 18x18 inches. I suggest calico or other fall printed fabric. But you can even use old flannel shirts, a table cloth, or cloth napkins. If you're purchasing fabric, a fat quarter is the perfect size.
  • 1 roll of toilet paper, jumbo size
  • a twig or stick around 6 inches long
  • silk floral leaves or dried leaves

As you can see from the ingredient list, this isn't a precise project. You can make alterations depending on the supplies you have on hand. The beauty of it is that there is no glue, so the fabric isn't harmed in any way. You can press it and reuse it after the season is over and put the toilet paper back in your stash cupboard.

Place the fabric wrong side up on your work surface and place the roll of toilet paper in the center of the square. Now, bring the edges of the fabric up to the top of the roll and begin stuffing the edges of the square into the center of the roll.


Keep stuffing until all of the rough edges are stuffed in the center of the roll. Keep the fabric loose and puffy as you are stuffing, not pulled tight around the roll. When you are done, adjust the "bunches" of fabric to look evenly puffy all the way around.

Now, gently push the stick into the center of the roll.

Finish the pumpkin by poking the stems of artificial leaves or real dried leaves around the stem. I used fall oak leaves, but you could use leaves from any silk flower. I scattered a few artificial leaves around the base of the pumpkin and put it on my table by my candelabra. It takes less then 30 minutes to gather the supplies and make a few of these easy fall decorations. Happy Fall Y'all!


See my link to this project on tour at these sites:

Katie Kubler's Fall Decor Link Party.

And also on Today's Creative Blog's Tuesday Get Your Craft On

Creations by Kara
Link Party


Hope for Old Linoleum

Some of my favorite Trash to Treasure ideas are faux finished. And I especially like projects that save huge sums of money or huge chunks of time. Even though this project took some time, it was well worth saving the effort of ripping out a floor, installing a new subfloor, and installing new vinyl. In the end, a faux finish saved both time and money. Cha-ching!

I was at my friend's house Saturday for a home party and I had brought my camera along since I had heard she had some trash to treasure gems. I wasn't disappointed! This bathroom floor is painted over linoleum. Vergene primed it and then she and her friend Maureen painted it to look like stones. Then they sealed it well with a poly coat. Believe it or not, it has held up well to use. See instructions below to paint your floor; it can save you a lot of money!


How to paint a linoleum floor:
  • Wash the floor with ammonia to remove any residue or build-up of old wax. If it has a lot of waxy layers, wash it multiple times. Rise with plain water and let dry thoroughly.
  • Prime floor with a primer such as Bulls-Eye 1-2-3 primer by Zinsser, or Kilz
  • For the paint layer, choose something with high durability. There are floor paints but there are some acrylic paints with high durability that would work as well.
  • There are many possibilities for faux finishes as well. In Vergene's bathroom, she painted the background a solid color and then painted "stones" over the top.
  • Once you have the floor looking as you'd like, let it dry well. Then, top coat with a clear acrylic polyurethane. Let it dry according to the manufacturers directions and then coat again. Repeat process several times to get a good seal on the floor.
  • It will take a few days for the paint to cure, so don't do anything that would scratch it during that time.

Unending Ideas for Windows

If I hadn't already found a ton of great uses for old windows, Kim at Twice Remembered has just given me a zillion more! Okay, well not a zillion, but a lot more than I had before. I never get tired of windows. I wonder if someone can have too many? Nah.

Be sure to spend some time looking around Kim's site. It's beautiful! Here is one of the ideas Kim links to that comes from Junk Market Style.

Got an Extra Footboard?

Bed Turned Message Center

This awesome idea comes from "The Happy Homebody" blog. With a little chalkboard paint, a footboard (or headboard) and an extra plain board, you can make a message center too! Here's a link to the instructions for this and other awesome projects.

Photo by The Happy Homebody

I Made it Without my Hubby


Shanty2Chic is having a link party and giveaway today. Why not enter your project? Just upload a link using MckLinky on the site and then follow the directions for including a link to Shanty2Chic on your post.

Other Sites that Inspire

Since I'm just getting rolling on the trash to treasure site, my content is still building. In the meantime, there are some fabulous resources on the web with even more terrific decorating ideas. Here are a couple:

www.reinventedkb.com
has lots of fun ideas and links to many more.

Cute blog and cute title at this one - shanty2chic.blogspot.com

Make a cool shutter that looks like an old barn door with instructions here from Funky Junk Interiors
Photo from Funky Junk Interiors


What's your latest project or your favorite trash to treasure website? Send us a link,

LinkWithin

Related Posts with Thumbnails