Content from this blog now appears on www.michellerayburn.com

t

Decoupage Fixes Everything, Right?

Decoupage was around in the 70's when I was a kid. I remember my mom and my aunts decoupaging napkins on plaques and wedding invitations on candles. Wrapping paper, greeting cards, pages from a magazine...you name it, they decoupaged it.

Then, we didn't hear about it as much for a long time. It's back, but I think it's often overlooked as a decorator's solution to a quick makeover. With all of the fabulous scrapbook papers out there, there is a plethora of options for anyone who wants to transform an object. I recently completed this project for a gift.

Joann Fabrics and Crafts has paper cardboard letters that can be used for a lot of things. I made one as a monogram for my friend's last name, but you could spell out a child's name to set on a shelf or hang on a wall. Since these are cardboard, they are light weight. For Transformation Tuesday, I'd like to give you some ideas for how you could transform something.

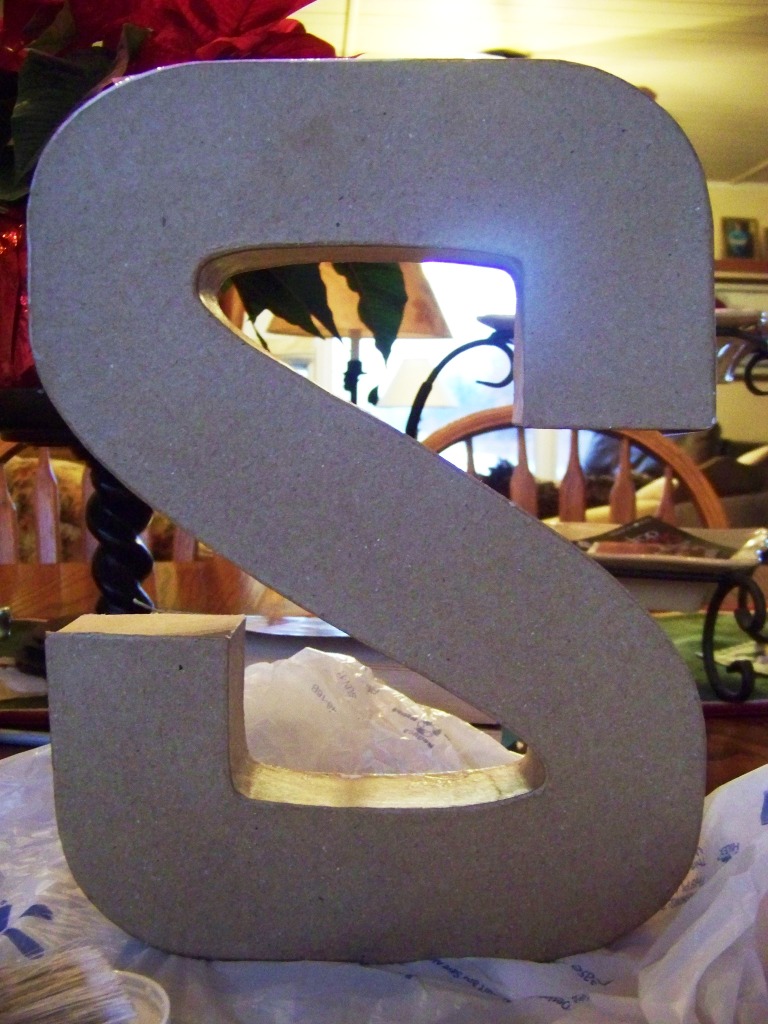
 It stands nearly 12 inches tall.
I traced the shape of the letter on the back side of scrapbook papers and then cut coordinating strips that would wrap around the edges.
I added a couple of extra cut-outs from the paper because they didn't fall in quite the right spot when I cut out the letter. Adding a few extra flowers on the front added interest.
 After the decoupage glue dried, I sanded the edges a little bit just to add interest. I like the shabby look of sanded edges.
 
Think of all of the things you can decoupage! That cardboard box that would make a perfect jewelry box. Or the Oatmeal canister you want to make into a storage container. Or the lamp shade that needs an update...the possibilities are limitless.

What will you transform?

Thrifty Thursday - Making Your Own Stencils

If you'd love wallpaper, or you have a stencil pattern in mind but you can't afford the stencil, why not make one? That's what Brooke from All Things Thrifty did. And she covered her walls with a beautiful pattern that's much more practical than wallpaper.

Check out the full post on All Things Thrifty for a very thorough tutorial and lots more pictures. Brooke, thanks for the inspiration for Thrifty Thursday.

WWYD Wednesday- Small Cabinet

It's WWYD Wednesday (What Would You Do)

I was browsing on Craigslist and came across this little cabinet and I wondered what someone would do with it. Unfortunately, I can't make the photos any larger, but I think you can get an idea of what it looks like.

The description says it has double sliding doors and that it has some scratches. I'm not really sure what its intended purpose was. Maybe it was for a TV?

The seller listed it at $15. So, what would you do if you ran across this at a thrift sale?
  1. How would you use it?
  2. What room would you use it in?
  3. Would you changed the finish?
  4. If so, what would you do to it?
On WWYD Wednesday, it's your turn to share ideas, so I eagerly wait for your comments. You always have such great ideas!

Transformation Tuesday- Plastic Storage Containers

On Black Friday, we decided to replace our dinosaur television with a new flat screen LCD. Once I got it in the armoire cabinet, I wasn't happy with the sound. Because many of these newer televisions have the speakers on the bottom of the screen, the sound bounces off the surface of the cabinet. It rattled a bit and the cabinet seemed to muffle the sound. So, I looked for something sturdy enough to prop the TV up on. 

I decided that a pair of plastic storage boxes with drawers was heavy enough, but the white plastic was hideous. I forgot to take a before picture, but it looked something like this. It didn't come in black at the store.
I decided to try out plastic spray paint. I haven't used it before, but this seemed like the perfect sized project to test it out.
I started out coating it a little too thick and the paint ran a little, so I toned it back and did several thinner coats (like the instructions on the can say). I know, I should follow directions in the first place!

I'm very happy with the results! I also used some decorative scrapbook paper and cut it to a size that would fit in the front of the clear plastic drawer. I attached it with a little 2-sided tape and it can be changed at any time. In fact, it would be fun to change it out seasonally. And it hides the DVD's and remotes stored inside.

It's a temporary fix until I find something classier. But, it works and now, I'm thinking of some other plastics around my house that I could transform.

Having a Safe and Happy Holiday Season

As we prepare for the holidays, I thought it would be appropriate to address the concept of family safety. Today, I'd like to feature a guest blog post that will get you thinking about safety as you bring out your favorite decorations and put up the tree.

Having a Safe and Happy Holiday Season

The purpose of the home is to provide a place of comfort and stability for a family to enjoy and rely upon. This purpose is exemplified and enhanced during the holiday season, as Christmas lights go up and decorations take over. Most would agree that there is little more comforting or satisfying than coming home to a house lit up with Christmas lights, with a wreath on the door and perhaps a fire crackling in the fireplace. 

While the joys of the holiday vibe can be somewhat seductive, it is also important to remember that for your home to obtain and maintain this level of comfort, it requires an adequate home security system. After all, there is no sense in decorating your home to display comfort and welcoming if the home itself is not completely safe. So, here are a few tips for home security during the holidays.
  • Going into the holiday season you should double check to make sure that your security system includes working smoke alarms. With lights strung up all over the place, constant cooking, and likely fires in your fireplace, your risk of a house fire undoubtedly increases during the holidays. So, while it may seem a bit paranoid to consider this to be a substantial risk, you will want to make sure that you have working smoke alarms. This can allow you to relax and know that even in the event of an unexpected fire, you and your family will remain safe.
  • If you place heavy focus on decorating the exterior of your home and your yard, you may be tempted to remove anything that clashes from the front of your house – such as a sign that might advertise that you are protected by ADT Security. However, it is important not to sacrifice your safety in the name of aesthetics. Make sure that protective signs and window decals remain clearly visible through your decorations, as these are important elements of home security that can deter crime.
  • Do not be tempted to set your alarm less frequently during the holidays. Particularly for people who have guests coming in and out of the house during the day and night, it can be tempting to slack off on setting the alarm. However, despite how annoying it might be to deal with managing the alarm while your guests come and go, it is once again important not to sacrifice security for comfort. In the greater scheme of things, the slight annoyance is well worth the potential benefit. 
Guest post brought to you by homesecurityfamily.com. Article printed with permission. This content may not be redistributed without permission.

Transformation Tuesday- Crochet T Shirt Rug

What do you do with a pile of T-shirts that have a rip or a stain but are otherwise in good shape? Make a rug! At least that's what Shawna at A Very Dandoislion Life did. She shows how to cut the T-shirts into strips and make T-shirt yarn. Then she crocheted them into rugs. I love the colors.
Photo belongs to A Very Dandoislion Life
Check out the full post at A Very Dandoislion Life for the tutorial. Shawna bought T-shirts at the thrift store, but I could see cleaning out my boys' closets and getting rid of ones that are small or have holes. Thanks for the great idea Shawna!

Dry Erase/ Chalkboard Vintage Window Message Center

I just finished a customer order for one of my vintage windows, so I thought I'd share with my readers. The top of the window is glass backed with paper decoupaged on. The glass works as a dry erase board. And the bottom is chalkboard paint (applied to the front). A handy little messaging center.

I know it's a little hard to see the color in the second one. A little too much sunlight in the living room when I took the shots. The little calico pouch is the eraser. I sew a pocket and filled it with batting.


Friend Friday - 11/11/11

I thought it would be appropriate to mention on Friend Friday that one of my blogging friends has featured my blog this week. 


She's got a fantastic blog hop happening over there, so hop on over and link up to Suzy's site!

Thanks Suzy! That was fun.


My Latest Art- Transformation...uh..Thursday.

Um, it's a little late for Transformation Tuesday. But if you don't mind, I'd like to squeak a Transformation Thursday in here (it will be almost Friday by the time I get it posted, but who's counting?)

Here's what I did with some of my stash of vintage windows. I love how they turned out! Between these and the ones I made last year, I had a nice little stash last weekend to take with me to a local craft show. I sold half of my inventory. Yay!

I started with plain window sashes. Some were really weathered, others weren't so much. So when they were all done, if they were too white and clean, I used a little tan glaze to make them look more aged.
I planned to use chalkboard paint and the can said it could be used on glass. But I was a little skeptical, so the first window, I primed with 123 Primer. But then, I noticed when I was putting on the chalkboard layer of paint, the primer was coming off, so the next windows I decided to just put the chalkboard pain straight on.
The French door was very old and it was peeling a lot, so I gave it a coat of poly to seal the paint just as it is.

After the WWYD Wednedsay challenge last week, I took your advice and left the top as it was after I had decoupaged paper to the back of the glass. I didn't add anything to the front.
I decoupaged paper to the backs of the top part of the window sash and painted chalkboard paint on the bottom. I tried different method for paint application. I found that a soft nylon brush worked just as well as a little foam roller.
 
 
 I decided to do some with chalkboard on both top and bottom.
 And some were solid glass, so I did the whole thing in chalkboard paint.
 Some were skinny little windows. Notice the cotton pouch hanging there? I sewed little pockets from cotton fabric and stuffed them with batting for erasers.
 The big French door is my favorite!
The paint can suggest conditioning the painted chalkboard surface by rubbing the side of the chalk over the whole thing and then erasing it. The surface can be washed too.

I used Rust-Oleum brand chalkboard paint in Black Flat. Chalkboard Paint can be used to create a usable chalkboard surface on metal, wood, masonry, drywall, plaster, glass, concrete, unglazed ceramic and hardboard surfaces that can be written upon and erased cleanly. This latex-base paint is easy to clean and is formulated to withstand the rigors of daily use.


What Would You Do Wednesday - Vintage Window

I'm working on these windows and I have a question for my readers. First, let me tell you what I've done so far. I painted chalkboard paint in the "bottom" panes of this very old French door and I've decoupaged decorator paper on the backside of the upper windows. I'm using the door sideways, so I've left the original hinges on the side to use as hangers for the artwork.

Now here's my debate.

Should I add numbers 1-5 in the upper panes with vinyl lettering as an accent? Or should I leave them as is? The glass in the top can be written on with dry erase marker, but since I have chalkboard on the bottom, I'm not sure it's necessary to worry about writing on them. 

So, what would you do? Blank or numbers.

Transformation Tuesday - Sneak Peak

I SO wanted to be able to show you my finished transformation today, but alas, paint can't be hurried. Ok. I had some other delays too. But, while I watch my chalkboard paint dry, here's a sneak peak at the before and after transformation I'm working on.


Friend Friday - Plus a Transformation

It's great to be back to the blog. A vacation from blogging is good every now and then. A few weeks ago on Friend Friday, Amber from The Gypsie Trunk posted a sweet project that I just have to share. She made a clever coffee table from pallets.
Isn't that just plain cool? Love it!

Now if you want to know how Amber made this coffee table, you're going to have to hop over to her post at The Gypsie Trunk for the tutorial. Thanks for the inspiration, Amber.
Do you have a project you'd love to share? Then link up with the Simply Linked tool below. Just be sure you link to a specific blog post and not to your home page. (Go to the page you want to show off and copy the URL from the top of your browser).
If I feature one of your projects on the blog in the future, feel free to grab the button in the sidebar.


I'll Be Back Next Week

I've not blogged at all this week! I'm taking a short break and I'll be back next week. This week, I'm buckling down in earnest to work on my book project. And, I'm attending Women of Faith in St. Paul, MN as a blogger. I'm so excited! I'll be blogging about the conference over at Faith Creativity Life and tweeting from @michellerayburn. 

I can't wait to show you my latest trash to treasure project next week! Here's a teaser...it involves chalkboard paint.

Friend Friday - Link Your Blog

Happy Fall!

It's Friend Friday and it's your turn to show us what you've been up to on your blog. Have you made fall projects, read a great book, did a homemaking project we'd love to see? Then link up with the Simply Linked tool below. It really is that simple. Just find you latest favorite post from your website, copy the html address that you see in the top or your browser window and paste it into the link tool.

Just be sure the link goes to a specific blog page not to the home page of your website. Links that point to a home page will be removed. If you'd like to create a link on your website back to Trash to Treasure Decorating, I'll leave that up to you. I don't require it.

Thanks for being a Trash to Treasure friend!

What Would You Do Wednesday - Vintage Milk Cooler

When I was a little girl, we drank milk from glass bottles at school. A milkman delivered the bottles to the school in metal crates. That was after the days when a milkman also used to do home deliveries, lest you think I'm that old. But speaking of the days of deliveries, I found an old milk cooler in a pile of garbage my husband was hauling away for some neighbors. I snatched it up thinking I could do something with it.

This is the type of box you'd leave on your porch and the milkman would bring milk every day. In fact, I think it might be called a porch box. 
Now I need your help. What would you do with it? It has a styrofoam type liner inside and there is some rust inside the bottom, but I'm sure you can help me come up with some use for it. We have to, or else my husband will harass me to pieces about saving this thing from the trash.
 
 
 Leave your comments below and maybe I'll use one of your ideas and post it in a future blog entry. Check out the other stuff I snagged from that load of garbage. I know, it's a husband's nightmare, but I couldn't help myself. Watch for future posts showing what I plan to do with this stuff.

LinkWithin

Related Posts with Thumbnails