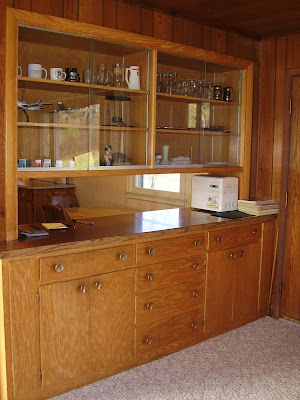
But, I wasn't in love with the 70's yellowed oak, or the giant brushed brassy knobs. I didn't want to paint the wood because I liked the grain, so for a while, I was stuck with this.
And then I had some inspiration. I figured if I could make some wood look pickled by whitewashing it with white paint, why not try to darken the wood with darker paint? So I got out some of my craft paints. Yes, that's what I used, bottles of acrylic craft paint. Using a disposable plastic tray, I put blobs of different colors in the tray: black, burgundy, chocolate brown. Then I added some water to dilute the paint and make it more like a wash. I dipped a brush into the color and started painting it onto the surface. I made sure that I kept it a little bit streaky so that I didn't lose the look of wood grain. The color was sort of a mahogany (reddish brown).

In other words, I was trying to tint the wood, but not to fully cover the wood with paint.
This is how it looked right after I painted it. I hadn't found new handles yet, so it still has the ugly brassy ones.
Once I got the paint wash on, I sealed everything with several coats of an acrylic polyurethane. This protects the finish from scratching (without it, it would easily come off) and it adds shine. The craft paints dried to a more dull color so the poly coat added brilliance. The can says you can't use this acrylic poly coat over paint, but it works fine. I saw it on TV so I figured I could do it too.
I found handles at a local building supply and salvage shop. I know you can't see it i the picture, but the bottom of the sliding glass doors is a brushed silver. The new handles were a brushed silver and I got the whole bag for around $5. I have lots of extras too.
After I finished everything, I realized that the hinges on the doors were still a brassy color. So I got out a can of silver spray paint. I sprayed a little on a small artist brush and quickly brushed it over a hinge before it could dry. Then I kept spraying and brushing until they were all lightly coated with silver. this way, I didn't have to remove them, and I was able to tint them to match.
I was so excited with the outcome! And it cost me nothing since I already had all of the supplies in my basement. You can see from the original picture that I also painted over the paneling that surrounded the build-in. In fact, I plastered it with a special texture paint for paneling. My whole house is becoming one big trash to treasure makeover!
This week, I'm linking my blog to these other blogs:
This week, I'm linking my blog to these other blogs:
- Trash to Treasure Tuesday at Reinvented
- Metamorphosis Monday at Between Naps on the Porch
- DIY Day @ A Soft Place to Land


Great job M! Love it!!! tb
ReplyDeleteVery nice! It looks awesome! Love the way you reinvented this piece.
ReplyDeleteThis looks wonderful. Thanks for sharing. Cheers, Lia
ReplyDeleteWhat a beautiful change! I love the idea of spraying onto a brush! I'm going to have to try that.
ReplyDelete