Content from this blog now appears on www.michellerayburn.com

t

Follow Friday Blog Hop - Link Up!


Friday! Time to Show Off Your Blog

It's Follow Friday again and I've been busy turning trash into treasure this week. I'm most proud of my cabinets that I faux finished. It's like a spring face-lift for my living room. 

Next week, I'll show you the end table and lamp that I did in a faux finish and I'll show you how to create a dark maple looking finish with paint and glaze, right down to the look of wood grain.

What projects are you doing this spring? Have you faux finished something, created a must-see tutorial, redecorated your blog? Link up on the Follow Friday Blog hop with the Linky Tool below and we'll stop by and see what you made. You'll be able to add a thumbnail of your project if you have a picture on your post.


Be sure to link to specific blog post so that we can find your fab projects easier. And, if you don't mind, mention on your blog that you're linking up to Trash to Treasure for the blog hop. You can even get the code and paste the blog hop on your own blog. 

WWYD Wednesday

In my junk excursion to Emerald Grove, WI, I found a stack of old ceiling tiles. They were in a pile of rusty metal, and they don't look so pretty as is, but I bet there is something that we could do with old tin tiles. What would you do with this?
I imagine at one time, it probably looked like this on a ceiling somewhere:

 I'll get us started with a couple of ideas I found on the web, and then I can't wait to see what you come up with. If you have a link to something you've made, be sure to link up. Or feel free to link to your blog (why not get free publicity?). Either way, share your fantastic idea in 350 words or less. 

At the end of the week, I'll choose the idea that I think is the most creative or unique and I'll label it the winner. Since the new Linky Tools is different from the old MckLinky, there isn't a line to post your name, so please add your name at the end of your idea so we can give you credit or leave it blank if you want to be anonymous.


Finishing Touches For Cabinet Makeover

When I finished the cabinet makeover, I decided that I needed to add a few more touches. After all, if the men who live in my home thought it was primed rather than glazed to perfection, guests might think the same. Although, I'm sure most of my guests will have more imagination than my sons. Anyway, I decided to make the cabinets match my faux fireplace. 
So, I got out the stencils and stenciled the same design on the doors. There are 2 pieces to the stencil which gave flexibility to make it fit right. 
But that wasn't quite enough. I didn't want to put the old wooden knobs back on. Remember these?
So I headed for the home improvement store on a mission to find something the brought these cabinets into this decade. I chose a ring pull for the large cabinet. 
I chose smaller but similarly finished knobs for the smaller cabinet.
I did not drill these holes. They came uneven from the factory, can you believe it?
That wraps up this part of the makeover. Stay tuned for the makeover of those lamps and end tables from the WWYD feature

I've linked this post to:
Antiprocrastination Tuesday at New Nostalgia
 Transformation Tuesday at The Pumpkin Patch
Letting the Creative Juice Flow Linky Party at These Creative Juices


Faux Finished in Whitewash

In one of my earlier What Would You Do? features, I posted pictures of some of my dated 80's and 90's furniture that I would like to update.  You gave me your terrific ideas and I took them all into consideration. It's time to unveil the changes! In this first post, I'll show you what I did with the two cabinets. They started out looking like this: 
I thought the golden pine finish was a little bit dated, and I thought the pieces might be a little heavy for the room. I thought about making them dark like my TV cabinet, but then decided a lighter color would be better. The smaller cabinet holds my music for piano students and the larger one holds my sewing supplies, but since they stand right by where people come in and out of my home, I didn't want them to be so prominent. So, I decided on the whitewashed finish that I have on my faux fireplace (see the fireplace feature here). 

The point of no return...cabinet doors ready for priming.
 

First, I primed both cabinets in white. A primer like BIN primer by Zinsser or Bulls-eye by Zinsser, or Kilz works best on shiny or non-porous surfaces. The primer dried quickly. 

Then, I base-coated the cabinets. Since I was planning to do a glaze finish, I chose a pecan color (kind of orangy brown). A dark gold would work well, or a cherry color, depending on the look you're going for. My base color is the middle one on the swatch.
 
I chose a good interior paint with a lifetime warranty. I used a satin finish because the glaze can said this would work better than flat.
 

The instructions on the glaze can say to let it dry 24 hours before glazing. I'm way to impatient for that, but I know you'd follow the directions. So please, follow the rules. After it has dried for *cough* 24 hours, you're ready to glaze.

I used a Dutchboy glaze that comes in a gallon pail and you mix it with latex paints to tint it. It's supposed to be mixed one part paint and 4 parts glaze. I eyeballed these amounts, but you can measure if you like precision.

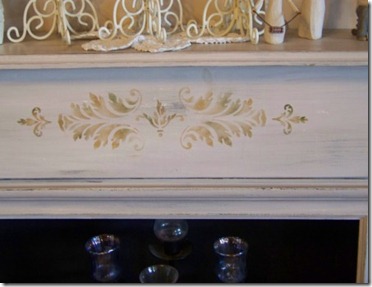
To make my cabinets look whitewashed, I used white paint in my glaze. Now, you're probably wondering what I went and painted that darker color on for if I was planning to just paint them white. Well, that's a good question. When I did my fireplace finish, I painted a darker color, painted white over and then sanded off some edges to make it appear aged. With this cabinet, I didn't want to sand for fear I'd end up with the yellow pine showing through. The glaze gives me the freedom to wipe off some glaze here and there while it is wet to get that aged look. The darker color underneath gives me some color depth when I play with the glaze.
Because I'm artsy and I like blending and shading, I mixed up three glazes. The largest one was white. Then I mixed a little with the background color and a darker brown so I could streak on other colors. 
Working in patches that wouldn't dry too quickly, I painted on the white glaze, allowing it to be a little streaky. Then I used a damp cotton rag to gently, very gently, remove a little of the glaze on some of the edges and in a few other places. Then I dipped just the corner of my brush into a brown or pecan colored glaze and touched it here and there, blending it well. 
I'm guessing it's taboo in the glazing world to go back over areas that have already been coated, but I kept blending and streaking all over the place. I did the cabinet sides the same way.
 Here is the finished glaze. 
My boys, who have little decorating imagination, came home from school and asked why I had left the cabinets primed. Whatever. In my next post, I'll show you how I updated the knobs and added a little more pizazz to both cabinets to finish the project.
This post linked up to:


Motivate Me Monday at Keeping it Simple
Keeping It Simple
2nd Time Around Tuesday at A Picture is Word 1000 Words
Get Your Craft On Tuesday at Today's Creative Blog
DIY Day at A Soft Place To Land


DIY Day @ ASPTL


Stop by these sites for more fantastic Trash to Treasure ideas!

Paneling- On the Ceiling?

I've been working on a project based on your "What Would You Do With This" ideas from a while back and I can't wait to share my pictures when it's done. In the meantime, I'm looking for your input for my readers who are overwhelmed with paneling. 

When we bought our home, we inherited paneling. A lot of it! In fact, in the three rooms we had paneling on the ceiling. My living room, a 24 by 35 foot space was one of those rooms. Here's how it looked (you can only see 1/3 of the room in this picture):

Cozy, but too dark, and waaaayyy dated!

This was in the kitchen...

A few weeks ago I showed what I did with this paneling

And here is one of the bedrooms...

I didn't do anything to that paneling yet. I've plastered and painted some of the paneling in my home with a special product made for plastering over paneling. However, I've noticed it's cracked some with winter expanding and foundation shifting. There has to be something else I can do with the ugly paneling that remains.  At least my living room is pretty though! So today, I'm wondering....Oh, wait! You want to see that after picture don't you!
 There you go. I painted the ceiling and plastered the walls. Essentially, after plastering 3/4 of the way around the room I was so sick of it that I decided I could live with the grooves on the ceiling.(Note on 4/26/2010: Ignore the dated upholstery on the chairs. That's been fixed too!)

 It's What Would You Do With This Wednesday?
So today, I'm wondering, what would you do with a house full of paneling? What have you done with paneling? Would you faux finish it? Rip it out? Cover it in some way? For the sake of all of my readers who are stuck with hideous paneling who cry "Help!" tell us what you would do.

You have 350 characters to describe your idea and be sure to include a link to your blog or photo of what you've done with your paneling if you have inspiration to share. Or, if you don't have pictures, we still want to hear the description of your idea.  

4/27 Update: The new Linky Tools doesn't allow me to rank the idea posts and name a winner. So, I've edited the list and labeled a post as a winner. Congrats to the reader who contributed the idea for using brown bags on paneling. Great idea! Here is a tutorial on the web for using brown bags as wallpaper.

What Trashes Your Treasure?

 What Complicates Your Life Right Now?

This week, I took a break from What Would You Do Wednesday just to catch up on a few things. After traveling to speak last week and prepping to speak this coming weekend, I'm stuck with responsibility instead of decorating projects. But I love speaking, so this is a great thing. 

I do want to share one thing that's been on my mind this week. I'm thinking of my readers, their busy schedules, their tight budgets, and their big dreams and I know that some of you are frustrated. You know how I know that? I've been frustrated before too! Sometimes, we get so busy that we don't have time to do the things that bring us joy and relaxation. Things like crafty projects. Or we set aside our dreams and pursue just surviving the day to day stuff.

It gets downright depressing when everyday life takes so much time that there isn't much left over for fun. What trashes your treasure? What makes it difficult for you to complete the projects you'd like to? What gets in the way of your dreams?

If you're in a difficult time right now, hang in there. We all go through seasons. In the meantime, I'd love to have you link up this week to try out a brand new MckLinky tool. 

Link Your Blog
Since I'm trying it out, no theme or limitations this week. Just add a link to your blog and see you thumbnail picture below. It's a "Come Visit My Blog" party. 

Note: I tried it myself to see how it works. Just click and follow the directions for adding your thumbnail pic. You can upload from the computer, or it will give you options from the blog you're linking up.  

Antique Chandelier - What Would You Do?

Weeks ago when I stopped at the antique shop/ junk store, I took pictures of these old chandeliers. Aren't these cool?

What would you do if you found a deal on such a thing at a thrift sale? Or what if you have one in your garage? Do you have plans for it?

This week on What Would You Do, I'm looking for your ideas. Think about the possiblities. What if the wiring was good? How would you use it? Tell us how you would paint it, where you'd put it and how it would add charm to your decor. 

What if you discovered that it was broken? Would you have it re-wired, or do you have some crazy fabulous idea for how you would repurpose the chandelier?
You have 350 characters and spaces to post your idea. Be sure to give yourself credit so we can all check out your blog too, even if your link has nothing to do with the specific idea!
What Would You Do With This #9

Update: 4-15-2010
Congrats to Jill from Live to Read to Live for yet another GREAT idea for WWYD! 


Recycled Repurposed Ladders

Last week, on WWYD I asked what you would do with an old ladder. So, I thought I'd devote a post to showing you  some great ideas for things to do with an old ladder. They aren't my ideas, so check out the sites and links I've provided and stop by and tell the original poster how much you like their idea.

The first idea comes from Remodelista. Isn't this pot rack totally cool? Now I wish I had one.
Photo from Remodelista site

Or how about this one from a Woman's Day article? Yep, I'm jealous of that one too. You think my husband would miss his ladder? Would he notice if it was hanging on the kitchen ceiling?
Bernadette even gives instructions in the article for how to make your own pot rack from a ladder.

There are other ways to use an old ladder. How about a book shelf? Yeah, I know. I couldn't envision it either, until I saw this article from Ette Studios. 
I'm not sure if she borrowed the photo or if it is her own, but Bridgette doesn't say. Either way, it's a great idea. You'll find another bookshelf type idea at Mother Earth News where two identical ladders are used with planks between. 

On A Rustic Garden Blog, blog author Susan Ingram has several ladder ideas including this photo display shelf.

You'll want to check out ivillage Garden Web for a whole forum on ladder ideas. This one is on that site:
 Photo from ivillage

Funky Junk Interiors is one of my favorite sites for trash to treasure ideas. They have this sweet ladder. It stands on the kitchen island to hold a light.

They also have this towel bar idea:

I could see using a ladder hung horizontally for a faux headboard for a bed. Or suspended from the ceiling and draped with gauzy fabric to create a canopy. It might make a plant holder or a magazine rack. It could become an outdoor trellis. The possibilities keep unfolding!

I'm hoping MckLinky will be back up and running tomorrow so I can post WWYD Wednesday. In the meantime, I'll see you ladder. I mean, later.

LinkWithin

Related Posts with Thumbnails