Content from this blog now appears on www.michellerayburn.com

t

WWYD Wednesday - Dominoes

I bought a box of assorted sized wooden dominoes for 25 cents at a yard sale. Now, I'm wondering what to do with them. Any ideas?
 It's What Would You Do Wednesday. The day when it's your turn to tell me what you would do with this item. I didn't count them, but it's an empty chocolates box full.
 I'm thinking I could make jewelry or a picture frame...or who knows what?
I can't wait to hear your ideas!

Transformation Tuesday - Furniture from...a Box Spring?

Sometimes, the creativity of my readers just amazes me. I received an e-mail from Linn at The Home Project last week with a photo of the new furniture she and her husband made from an old box spring. My husband would likely use the wood for firewood, or toss the whole thing on the brush pile. But not Linn!

You'll have to hop over to her blog to see the full post, but here's a teaser for you from her photos. This has to be one of my favorite Transformation Tuesday ideas.
Linn shows their full tutorial of how they created these great pieces for their deck. 
Thanks Linn, for sharing your creativity with my readers.

Photo of the Week - Muse Monday

It might look like impressionistic art, but it's really a photo taken in my back yard during a rain downpour while the sun was out.

Teapot Turned Flower Pot

My husband rescued this big aluminum tea kettle for me from the trash. I love it! I turned it into a flower pot and now I'm waiting for the Gerbera Daisy to bloom. Now, if I could only remember what color flower I planted in there.

What Would You Do Wednesday - Vintage Shutters

I bought this shutter at the Apron Chicks Barn Sale in May, and I'm planning to hang it on the wall. But now I need your help. On this What Would You Do (WWYD) Wednesday, I'm wondering what you would do with it and I'm looking for suggestions.
 At a yard sale, I bought this berry garland, so I'm thinking I'll use it on here somehow. But now it's your turn. What would you do to turn this into a wall decoration?
Leave your WWYD comments below, and who knows? Maybe I'll use your idea!

Transformation Tuesday - Pallet Benches Part 2

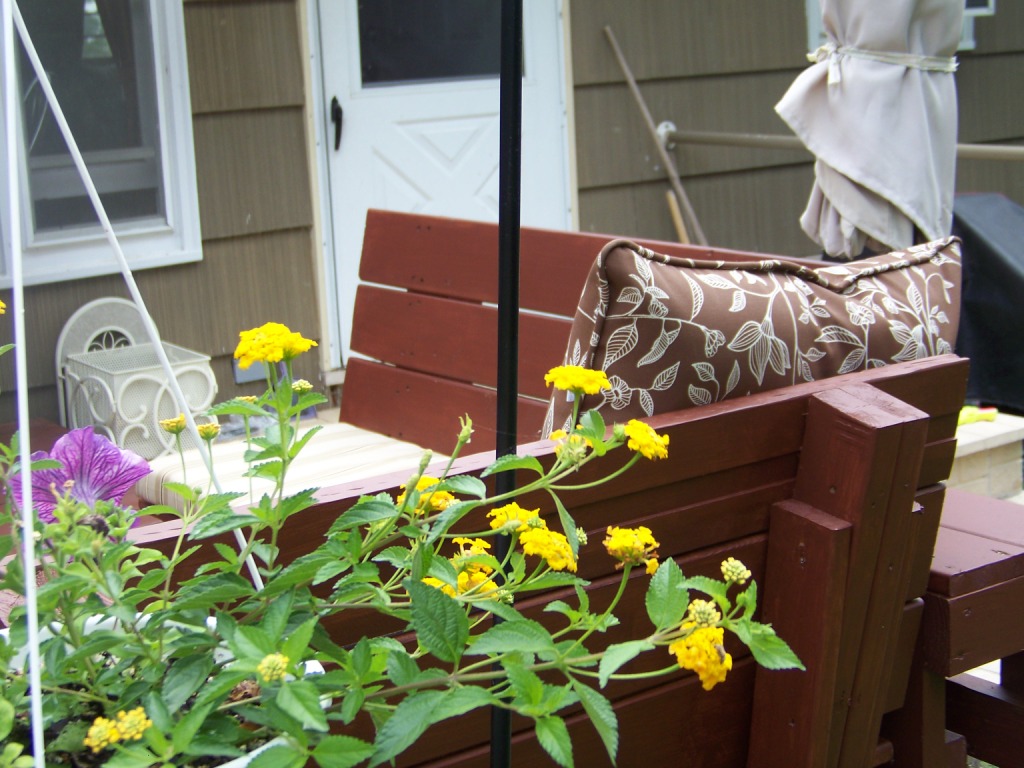
I finally had some dry days to get the deck re-stained and the new benches coated for the first time. I love how it turned out! In case you missed the first post, the benches are made from pallets and my only investment was in the bench pads from Walmart (only $20 online, and much more in the store). The pads were exactly the width of the pallets, and just the right depth for the way the seats worked out with the pallets. 
I originally purchased pads for the back rest too, but then changed my mind when I decided it was just as comfortable without them. So I returned them and got a big pillow which will make a great arm rest, or napping spot.
Here's a shot of what they look like from the back. Again, I'm sorry that this project just doesn't lend itself to a tutorial. Pallets are so different depending on where you get them, which means you have to design as you go.
We cut the pallets up and made one into the bench part and another into an upright (with just a little bit of an angle on the backrest). Then, we used additional pieces as supports to screw everything together.
 We stacked two pieces of pallet on top of each other to make them taller.
Here's a view from the yard. The rest of the deck is pretty low to the ground, but this corner was higher. So, the benches take the place of needing a railing.
 We added a little table in the corner where the two benches meet. Great place to set a book and a cup of coffee.
My husband added an extra pole for the patio umbrella on the side of the deck. I can have it over the seating, or attach the umbrella to the pole on the table on the deck. It's nice to move the shade around as needed.

These chairs also live on the deck. I bought them two years ago.
 And when I need to cover the pads for rain, I can fold the bench pads and put them under these rain covers from the other chairs. It makes for nice storage for my fabric pieces.
 Now, doesn't that beckon you to sit and relax? I'm so happy with the transformation. Total cost: $55 for the two cushions and the pillow.
It's my birthday present from my husband. :-)

Weekend's Most Pinteresting Roundup

This week, I pinned these Trash to Treasure ideas on Pinterest.

Here's a clever idea for a shutter from Buckets of Burlap.
Using a rake for a curtain rod? I think so! Love this idea from Better Homes and Gardens.

I guess I haven't been as busy as usual on Pinterest this week, so I have only two favorites to show you this weekend.

Lamp Shade Repurposed

I purchased a wicker lamp shade for $1.00 at a garage sale, but when I got home, it didn't work for any lamps in my home.  I figured, I'd just donate it to Goodwill, until I came up with a repurposing idea.
 When I flipped it upside down, it made the perfect little waste basket. I teach piano lessons and keep tissues on the piano for little noses. This is just the size to put under the piano to collect the used tissues and trash.
 I recycle my Walmart bags as liners.
Now I'm glad I bought it.

Transformation Tuesday- Benches from Pallets Part 1

Almost 2 years ago now, we moved our deck from the front of our house to the back. (Finished Deck). Since then, I've been wondering what I could do about the one corner that's just a little too tall for safety. We chose not to put a railing on the deck, since most of it is low to the ground. But one end, is higher. I considered a partial rail.
 In the meantime, I put the grill by the edge to keep anyone from walking off the edge.
Then I came across an idea on Pinterest for a sofa made from pallets and I thought having benches on that corner would be perfect. As much as I don't mind this chair that I fixed up, benches sounded like a great idea.

So, I asked my husband to give me a hand with the idea. He found some free pallets for me. They were perfect for the project, since there weren't the typical rough oak pallets. These were pine, and they almost looked like bench seats already!

Using the Pinterest inspiration, we made the benches up as we went. Thus, my lack of a tutorial. Your bench design will depend on the pallets available to you.
 
 Starting to take shape.
 Rough yet, but coming along...This is part of the stacking and fitting process. Nothing is screwed together yet.
Dry stacked so we could see how they fit. Now, I'm sanding and staining. However, part 2 will have to wait until next week. I need a couple of dry days for staining!

I can't wait to show you the finished benches, complete with chair pads next week.

Weekly Most Pinteresting Trash to Treasure Ideas

Here are a couple of cool T2T ideas I found on Pinterest this week. I themed everything by doors this time:

I love this idea with a door hung sideways. Check it out at The Roseland Family blog.
 Isn't this green door a fun coffee table? The original post from Joys of Home has a tutorial for you.
I just love the doors designed by My Pink Life. Here are two, but you'll need to check out the full post to get the inspiration.
This next one from The New Home EC shows how classy a trash to treasure makeover can be. The use of upholstery tacks takes this headboard from an old door to a new level.
How about a weekly planner/chalkboard from an old door? Took me a while to hunt this one down to give proper credit to Donation 2 Decor on the original post.
T2T doesn't need to look old and worn. This modern take from a feature on Apartment Therapy proves it. Click on "take the tour" of Eric and Lauren's apartment to see the full slide show.

There you have the most pinteresting projects I found this week. I've been on the road at a writing conference all week, but had a few moments to look over Pinterest during  in between meetings.

LinkWithin

Related Posts with Thumbnails