Content from this blog now appears on www.michellerayburn.com

t

Giant Letters- What Would You Do?

Neon No More

I'm seeing numbers and letters all over other blogs, especially the really hip decorating blogs. Since letters and numbers are popular right now, I thought I'd feature this big letter that I found at a junk shop/ antique store recently. Of course, I couldn't resist the urge to snap a picture of it since it was an M and my name is Michelle, although the people in my house think my name is Mom. 

Anyway, I didn't buy it, because I didn't have a clue what I'd do with it, but I knew the picture would be perfect for WWYD Wednesday. I believe it's from some sort of big sign from a building but I doubt it lights up or anything anymore.
After I snapped the picture, I did find one picture in a Junk Market Style book that featured a letter like this as sort of a night stand next to a bed.They have a picture on their site of some similar big letters. 
I wasn't able to find a photo of the design from the book on their site, but it's in the book and the book is chock full of awesome trash to treasure decorating ideas. Fro on ly $8.98 on sale on Amazon, it's a terrific deal! They didn't really do anything to the letter, just stood it by the wall and put candles on the tops of the W. I bet my readers can come up with other ways to use a letter like this.


I'll give you 350 characters and spaces to post your idea this week. And be sure to give yourself credit so we can all check out your blog too, even if your link has nothing to do with the specific idea!


I'm linking up to some other great ideas this week at

What Would You Do With This? #8
Update April 8, 2010
Congrats to "IowaGirl" for the most unique way of using the letters as a headboard! Way to think outside the box. 


What to Do With Old Ladders

What Would You Do With This Wednesday #7
This week, it's your turn to brainstorm ways to decorate with an old ladder. It could be a whole step ladder that's too weak for normal use, or a weathered piece of an old extension ladder. Are there some ways to make it more modern and less country? Or does such a piece lend itself only to a country decor?
I found the above pieces of ladder at an antique/ junk store. But maybe you have one that looks more like this:
What would you do? Share your ideas below using the MckLinky tool. I'll name the "winning" (my favorite) idea next week. Sorry, I can't afford prizes, but I'll twitter and tweet about your tremendous creativity.  

Check out last week's WWYD about old chairs. Jill S. from Live to Read to Live had the most creative idea. She suggested, "Use it for an outdoor washing station. Hang chair so seat is 30 - 36 from ground. Fit a small bar sink into the opening of missing seat attach a mirror in the chair back space. Now you have a gardener's clean - up station." Great idea Jill!

Update 3-31-2010
It was tough choosing a winner this week. The ideas were all great! Thanks for linking up. My favorite idea arrived via e-mail from Jen. I'd love a ladder pot rack. But a very close runner up idea came from confessionsofacurbshopaholicblogspot.com Thanks Rose! I can't wait to see what she does with her new site.


Places to Find Treasure

Where do you find treasure? Beyond the usual yard sale fare, where can you find trash to turn into treasure? Passing through the little town of Emerald Grove, WI last week, I spotted this marvelous resource:
I know, it might not look like a treasure trove to some of my readers, but I see it as stuff waiting for inspiration. Here are some places to be on the lookout for your own treasure.
  • Antique shops
  • Yard and thrift sales
  • Second hand shops
  • Auctions
  • Basements of friends
  • By the curb (where it's legal to pick up stuff)
  • In your grandma's back storage shed
  • Liquidation sales
  • Flea Markets
  • From your local garbage man (involves getting to know him on a first name basis as your inside source for good stuff)
  • Craig's List 
  • E-Bay
  • Freecycle (see Yahoo groups for your local freecycle group)
I know there are many more places, so feel free to share your ideas in the comments below. Trash to treasure decorating depends on keeping your eyes and ears open at all time for great finds. Spring cleaning season is upon us, and I know there will be all kinds of treasure unearthed from basements, garages, and storage barns all over the country. Imagine the possibilities!

What Would You Do With This Chair?

You've probably noticed that WWYD Wednesday came and went. I was away at a conference and didn't have time before I left to set up a Wednesday post. I know, I know. I need to get my priorities straight. Or procrastinate less. Or plan ahead. I need a daylight savings week! Wouldn't that be cool? We could set our clocks back a whole week and it would be March 11th again today. Oh the things we could think and dream up with an extra week. 

As promised, on my way home from the conference on Wednesday, I stopped by the antique shopped I'd spotted on my way and I asked the owner if I could take pictures. Huey graciously allowed me to walk around and browse the fabulous piles of junk he has on display outside his antique store. The town of Emerald Grove is little but a blink of a place, but it's east of the city of Janesville, WI  at 8314 U.S. Highway 14, and it's a great location to get great customer exposure.

Right on the main thoroughfare of the unincorporated village, Huey has a treasure chest of stuff for those who love trash to treasure decorating, and those who love making junk art. In fact, Huey says he's going to learn to weld so that he can turn his own artistic ideas into fabulous pieces of art. If you follow this link to Google Maps, you can explore the front of the Antique Shop from the web.

I'll be featuring many things from this expedition in upcoming WWYD with this Wednesday posts.

WWYD #6

Today, I want to know what you would do with this chair that I found at the antique store. Some of the ladder rungs are missing and it's pretty weathered, but it's still filled with potential. Have you used an old chair in a unique way? Share your ideas and even link up your blog post with a picture on this week's WWYD?  

I'll name the "winning" (my favorite) idea next week. Sorry, I can't afford prizes, but I'll twitter and tweet about your tremendous creativity. 

(P.S. I won't be having a Friday blog hop this week since I'm already late posting WWYD from Wednesday)
 

Deciding What is Trash, What is Treasure

How do you decide what is trash that can be turned to treasure and what is truly trash? I used to collect anything and everything just because it was old or unique. But that led to a basement full of stuff I never found a use for. I'd purchase something at a thrift sale thinking I'd come up with an idea later, but inspiration never struck. Instead, my husband had to put up with my collection. Now, don't get me wrong, I still have plenty of stuff. Enough to consider myself a moderate packrat. But at least I've weeded it down a lot.

To prevent the clutter problem, I've created some guidelines for my thrift shopping that might help you with your own trash to treasure decorating and will keep your husband happier too.

Rules for Junking
  • Can I come up with at least three ways to use this item off the top of my head?
This will ensure that if you don't use it in one place, you might use it in another. For example, I have an antique picnic basket that can be used to store magazines next to my recliner, to store yarn and crochet supplies, or it can be a place to hide mittens and gloves by the front door. Once I've thought of at least 3 ways to use it, I'm likely to come up with even more. 
  • Is it worth what the seller is asking? 
Sometimes an item will be marked at a high price at a yard sale simply because it is old. Not everything old is valuable. Be sure that you're not paying too much for something that really is junk.
  • Do I need another one?
I love old rake heads. I have 2 of them on my walls right now, but I don't really need a 3rd. Too much of a good thing is a waste of money. So unless a friend is looking for one, I'll pass up the next rake head I see at a yard sale. 
  •  Is it safe?
 I have some old windows on my walls as artwork, but I'm pretty sure that there is lead in the paint that was used on them. If I had little children around or if the paint was chipping off, I'd consider them unsafe unless treated with something like a protective layer of urethane. So as you purchase 2nd hand things for decorating be sure to choose things that are safe for your family. 

By following these simple guidelines, you'll be able to eliminate some potential basement clutter and you'll enjoy the true treasures that you do find. 

Happy decorating!

P.s. I'm on a road trip to a conference and I passed the coolest junk place on the way down. I'm hoping to have time to stop on the way home. And I have my camera too! I'll post any cool finds.

6 Month Blogiversary Blog Hop

I can't believe it's already been 6 months since I started TrashToTreasureDecorating.com! I know, it's still a baby blog, but it's been so fun, so I thought I'd celebrate this little blogiversary with a little woo-hoo!

How do these Fridays come around so fast? It's another Follow Friday Blog Hop where you get to show me your blog. Some of my favorite blogs that I follow I've found through blog hops and link parties. I'm so glad you're all so willing to share your ideas. Sometimes, I'm just stumped for a good idea.

Take my WWYD Wednesday post, for example. I'm really stumped by Karyn's harp. There just has to be something more that we haven't thought of that we could make from that. In the meantime, I'm hunting around for next week's WWYD idea. I think I've been short on creativity this week because I've put a lot of time into prepping for some upcoming speaking events.

Tomorrow, I'm speaking to a group of ladies at their day retreat and I'll be showing some trash to treasure ideas and then giving an inspirational message on how faith can turn life's trash into treasures. It's part of my commitment to help people connect the dots between their faith, creativity and everyday life.

What have you transformed this week? Do you have a before and after to show? Maybe you're working more on your everyday life right now than on your creative side. Show how you cleaned up or reorganized your space, or how you're inspired by spring. Whether it's crafty, decorating related, or practical, we'd love to have you inspire us!


Trash to Treasure Decorating

Blog Hop guidelines:
1-Add a permalink to your specific post not the home page of your blog. We don't want to have to hunt for your brilliant idea. Be sure to check that the link works after you post.

2-Add a short title for your post. This could be your name or blog name if you'd like.

3- Link back to this post from your blog, or send a link to your tweeps on Twitter (mention @trash2treas).

4-Check out the links and leave some comments on the sites you enjoy.

That's all there is to it! I can't wait to see your links and ideas. Never used MckLinky? It's super easy. You don't need an account or any software. Just click on "you are next" below and type a title for the post (or your name) and add a link to the location on the web. It's that simple!

What Would You Do With This?

This, week, on What Would You Do With This Wednesday I'm featuring a question from fellow blogger Karyn from CanDarBry Garden. Karyn bought some fabulous pieces second hand, but now she's wondering what she should do with them, so I had her send me photos of her purchases.

First, she bought this cool mirror, and no doubt, she won't have any trouble figuring out what to do with such a fabulous piece.
 But along with the mirror, Karyn got a harp. No, it isn't a musical harp. It's the name given to the piece that an antique mirror would hang from. Now, I know what you're thinking. You're thinking Karyn should hang the mirror on the harp, between the bolts where it belongs. Great idea! Except this mirror doesn't fit that harp.

So, Karyn needs our help in coming up with a creative way to use that harp in decorating somehow. Okay, okay, don't harp on me. I'll give you some more pictures. (I couldn't resist a pun or two).

The harp
 Close-up Detail
 I know one of you has a brilliant idea out there. So tell me your idea in 300 characters or fewer on the MckLinky tool below. And feel free to link up to your blog so we can visit you. Karyn will choose WWYD winner next week based on the idea she likes best and I'll post the name.

Sorry, I can't afford prizes, but I'm happy to tweet your name and send you some blog traffic! Special thanks to Jill S. for the winning idea for the furniture refinish.

Do you have something you'd like some What Would You Do ideas for? Shoot me an e-mail or leave a comment and I'd love to feature your item. 

You can follow Trash to Treasure Decorating on Facebook now too. See the link in the sidebar. 
 

More Hardwood Floor Treasure

Yesterday, I posted about the hardwood treasure beneath the horrible carpet in my house. Here's an updated picture of how the room turned out.
Before

After

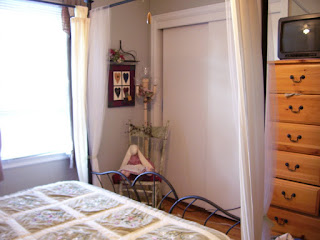
It's a small room, but so peaceful. As you can see, I decided to paint the damaged closet doors white. Even with stain blocking primer, they took multiple coats of paint. I'm thinking they had been oiled with something like Liquid Gold in the past. I painted all of the trim white and the walls a light green color. 

Can you believe that the only cost in this makeover was paint for the walls and trim and polyurethane for the floor? That's under $40 to make over whole room!

My mom found the comforter set at a yard sale and it matched the walls perfectly. The decoration above the bed is just an old window with a string of artificial berries added. Trash to treasure decorating sure leaves more room for other treasure in my budget! 

I'm linking up to these blogs this week:

Treasure Under the Carpet

When we bought our house, we inherited some of the worst carpet! I think buyers had passed over the house for several years mostly because the house was so badly in need of a face-lift. Since we had several months before we had to move for my husband's job change, we had some time to go up north on weekends and work on updates.

On one weekend, we decided to tackle the pea soup colored carpet. It was in all four bedrooms. This room had both paneling and the pea soup carpet. Eww. Someday, I'll do something about that paneling, but for now, it's not a bad room for a teenaged boy. By the way, yes, that's paneling in the ceiling too!
  This bedroom had peeling wallpaper and the awful carpet. I didn't take the world's best before pictures since I took them on our tour with the realtor before we closed on the deal. You can see a little bit of the carpet on this picture.
 There is no nice way of describing this carpet. I couldn't get it to the trash fast enough! But in the process of getting rid of it, I discovered it held a treasure.
 My friend Brenda came to help with the destruction renovation one weekend and I was working in another room when I heard a scream from the room she was in. She had pried up a little corner of the carpet and found the hardwood floor beneath. (Above, she is helping my son rip the old wallpaper off.) I thought she had found a mouse or a giant spider, but I was thrilled to see the wood! We found this hard wood in another room as well, and I found out that it's under half of my living room (future project there). I was so excited!


I sanded and varnished the wood floor and it's beautiful. When we had the carpet installer put new Berber in the two rooms that didn't have hardwood underneath, I had him cut away a little patch by the front door to help create more of an entry way feel. 

Eventually, when the rest of the carpet in that area wears out, I'll be sanding some more floors. In the meantime, I gave it some good coats of varnish and enjoyed the treasure that had been hidden beneath carpet for 30-40 years. 

Some of the best trash to treasure decorating changes are already right there under our noses!

Friday Blog Hop #9

Do you ever have weeks that go way too fast? I'm having one of those! So, I'm keeping my post short and sweet today. Did you have a terrifically creative week? Then my tired brain needs your fabulous inspiration ( I know my readers will love your ideas just as much as I will). Share what you've created, decorated, updated, and blogged about this week by linking up to:
Follow Blog Hop #9


Trash to Treasure Decorating

Blog Hop guidelines:
1-Add a permalink to your specific post not the home page of your blog. We don't want to have to hunt for your brilliant idea. Be sure to check that the link works after you post.

2-Add a short title for your post. This could be your name or blog name if you'd like.

3- Link back to this post from your blog, or send a link to your tweeps on Twitter (mention @trash2treas).

4-Check out the links and leave some comments on the sites you enjoy.

That's all there is to it! I can't wait to see your links and ideas. Never used MckLinky? It's super easy. You don't need an account or any software. Just click on "you are next" below and type a title for the post (or your name) and add a link to the location on the web. It's that simple!


What Would You Do With This?

I need a furniture makeover!

On today's WWYD with this Wednesday, I'm asking for your advice on updating some of my furniture. I just got a new TV cabinet, and I want to turn the old one, a cheap pine armoire into a cabinet for my sewing supplies. I'm planning to install a pull-out shelf inside for my sewing machine for quick mending, but I'm trying to figure out what to do with the outside. I'm tired of the aged pine and it's getting pretty beat up. 
 I also have another smaller cabinet near this one that needs some updating as well and I'd like to make them match.
 
  
What would you do with this? What kind of finish would you do? I have a pickled finish on my faux fireplace which is on the other side of the room, so I've thought about matching this:
 
But then I also like the finish on my new TV cabinet:
When you collect your furniture at thrift shops, you get a hodgepodge, but I love it. You can see that the mirror above the smaller cabinet has a cherry finish and I did a faux cherry/mahogany finish on my built in hutch, so maybe I should do that?

One more thing. I have two 20-year old lamp tables in the living room that were wedding presents and it's time to update them. The finish is ruined on one. Maybe I should make them match the cabinets since they all live in one big living room, dining room, bonus room space. 


I know, that's a lot to process! Now can you see why I'm overwhelmed with the decision? So what would you do? Which kind of faux finish would you do on the cabinets and the lamp tables? I'm pretty good at creating faux finishes once I have the idea. And I've stripped and refinished furniture too, so toss as many ideas as you want to. I can handle them!
 
Tell me your idea in 250 characters or fewer on the MckLinky tool below. And feel free to include a link to an idea that you've already done on your own blog, or just link up to your blog so we can check out your other great ideas. I'll name a WWYD winner next week based on the idea I like best. 

Sorry, I can't afford prizes, but I'm happy to tweet your name and send you some blog traffic! 

3-9-2010 Update: Contrats to Jill S. for the winning idea. I think that the lighter finish would keep the large pieces from feeling too heavy in the room. I'll be priming with black, painting with white and then sanding to distress. Honorable mention goes to The Prudent Homemaker for the great idea of replacing the knobs. I forget how much of a difference that can make. Thanks everyone!

Before and After Built In Hutch Makeover

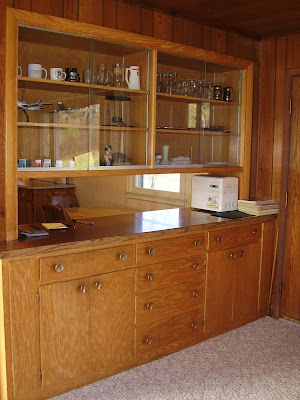
Last week, I showed you how I painted a laminate counter top and I promised to show you how I updated the built-in hutch that surrounded it. When we bought our house, I absolutely loved that it had this built-in because it allowed me to get my good dishes out of storage and actually use them. Our old house had no where for good dishes, so I had them in storage.

But, I wasn't in love with the 70's yellowed oak, or the giant brushed brassy knobs. I didn't want to paint the wood because I liked the grain, so for a while, I was stuck with this.

And then I had some inspiration. I figured if I could make some wood look pickled by whitewashing it with white paint, why not try to darken the wood with darker paint? So I got out some of my craft paints. Yes, that's what I used, bottles of acrylic craft paint. Using a disposable plastic tray, I put blobs of different colors in the tray: black, burgundy, chocolate brown. Then I added some water to dilute the paint and make it more like a wash. I dipped a brush into the color and started painting it onto the surface. I made sure that I kept it a little bit streaky so that I didn't lose the look of wood grain. The color was sort of a mahogany (reddish brown). 


In other words, I was trying to tint the wood, but not to fully cover the wood with paint.
This is how it looked right after I painted it. I hadn't found new handles yet, so it still has the ugly brassy ones.
 
 
Once I got the paint wash on, I sealed everything with several coats of an acrylic polyurethane. This protects the finish from scratching (without it, it would easily come off) and it adds shine. The craft paints dried to a more dull color so the poly coat added brilliance. The can says you can't use this acrylic poly coat over paint, but it works fine. I saw it on TV so I figured I could do it too.

I found handles at a local building supply and salvage shop. I know you can't see it i the picture, but the bottom of the sliding glass doors is a brushed silver. The new handles were a brushed silver and I got the whole bag for around $5. I have lots of extras too.

After I finished everything, I realized that the hinges on the doors were still a brassy color. So I got out a can of silver spray paint. I sprayed a little on a small artist brush and quickly brushed it over a hinge before it could dry. Then I kept spraying and brushing until they were all lightly coated with silver. this way, I didn't have to remove them, and I was able to tint them to match.

I was so excited with the outcome! And it cost me nothing since I already had all of the supplies in my basement. You can see from the original picture that I also painted over the paneling that surrounded the build-in. In fact, I plastered it with a special texture paint for paneling. My whole house is becoming one big trash to treasure makeover!

This week, I'm linking my blog to these other blogs:

LinkWithin

Related Posts with Thumbnails