Content from this blog now appears on www.michellerayburn.com

t

Showing posts with label Faux Finishes. Show all posts

Cedar Chest: Before and After Transformation

For today's Thrifty Thursday project, I want to show you a cedar chest that I was able to transform for a very small cost.
The chest had a very worn surface, and was missing some veneer on the lower leg part.
I liked the texture of the trim and the detail work. But I knew that whether I painted it or removed the finish, I would lose some of the detail.
Because of the missing veneer, I decided painting would be the best finish.
And because of this damage too...
First, I primed everything with a bonding primer. I like Bin 123 latex primer, but Kilz and Bullseye work well too.

Then, I coated it all with latex satin paint in a pecan color.
 Then, using latex glaze, I mixed some of a darker brown paint with the glaze and streaked it on. I kept a rag handy to wipe excess off.

 Be sure to streak with the grain.
 And on the detail areas, wipe some off to show contrast.
When it's all done, I will coat it with a few layers of poly. That could be water or oil-based. I also like to coat with a layer of Minwax finishing wax when everything has cured. It gives it a smooth, nonsticky finish.
You can do as much or as little on the glaze as you wish. I haven't had a chance to do the poly yet, so I'll post a pic when that's complete.

I had all of the paints in my stash of leftovers, so the project cost me nothing but time.

Upcycled Cabinet Door to Serving Tray

I'm going through some reader mail ideas that I have saved in a folder. But now, I have realized there were a couple that I never shared. Shame on me! I'm so sorry to those readers who shared their cute ideas and I neglected to share them. Ugh. 

For example, isn't this a great idea? Kunika from the Pretty Homely blog [that's the title of her blog, not my description of her blog] turned an old kitchen cabinet door into a serving tray by giving it a fabulous finish and adding handles. It's that pretty?
I could do this! I have a kitchen cabinet door that I had painted like a flag. And I have some leftover handles too.
The only problem with mine is that it's a little big, and it's pretty heavy. So, i'll save the idea for the future. Thanks for the inspiration Kunika!

Transformation Tuesday

This week for Transformation Tuesday, I want to brag about one of my readers who tackled her own Trash to Treasure project. Deb from Deborah Jean's Dandelion House was inspired by the finish on my chandelier makeover, so she decided to update the knobs and hinges in her house with a similar finish.  She's featured her results on a French Door makeover on her blog. I love the angle of Deb's in-progress photo below.
Deb painted the door and then transformed the knobs. You'll find that you can achieve similar results when you use Rust-O-leum's oil rubbed bronze (ORB) spray paint. Check out Deb's results below, and then hop on over to her blog to see the full tutorial of her project and the rest of her photos.
Thanks Deb for the inspiration!

Transformation- Faux Finished Cabinets


This summer, I took on a huge project as a volunteer at the Bible camp where my husband works. They've been building a new cabin from mostly donated materials that were salvaged from buildings being renovated and torn down. This meant that we needed to come up with a way to make it all look as though it belonged together. Not an easy thing if materials come from multiple sources.

The lower level of the cabin is an apartment suite for our guest speakers, so it has a sleeping room, private bath, and an open kitchen and living area.

I got to choose the colors for paint, flooring and counter tops and then I worked on the laborious process of taking white cabinets and making them look more in tune with the flavor of the warm pecan and cappuccino colored paints. Today, for Transformation Tuesday, I'll walk you through the process.

 The counter top picture was not the final one. We used a scrap for sink fitting purposes and the real counter top arrived after I'd completed the painting process.
 The peninsula provided a challenge since the back side would be facing the sitting area.
This pantry is on the wall where the refrigerator would go. It shows the cappuccino color really well.
 This shot of the doors spread out for priming shows the pecan color on the accent wall.
Once I removed all of the hardware, I primed everything with a 123 primer by Zinsser.
I  used a water-based paint, but thinking back, it might have been smart to have chosen to sand the cabinets a little to rough them up and use an oil base primer for a little better guarantee of adhesion. It worked as it was, but I had to be so careful not to scratch them at all until the final protective coat was on. These cabinets were almost more like vinyl coated than painted, so they were pretty shiny when I started out.

After priming, I began the faux finish with the same steps I used in my lamp tables. My goal was to end up with a dark, antique or old world finish. I used the same pecan color on the base coat that I used on the accent wall. Then I used a glaze mixed with a dark brown paint to streak on (with wiping and a brush) over the top. Once the paint and glaze had cured for a week (not necessary but with the humidity I wanted it good and dry), I gave everything three coats of oil based polyurethane. You can use water base poly, but since we already had the oil on hand and I was working with a camp budget, I used that. If you're going over a lighter color, be aware that oil poly can yellow.

And now for the after pictures...

This is the back that I mentioned that faces the living/sitting area. I kept the white ceramic door knobs for now just because we can't afford to replace them until I find a deal that fits the camp budget. since the sink and refrigerator are white, the contrast is okay.

The base trim under the cabinets hasn't been installed yet, but I couldn't wait to show the finish!
Once the varnish is cured, I like to finish everything with a paste wax from Minwax. It helps take away any tackiness in humidity and if you have any tiny paint bubbles, you can sand with a little super fine grit sandpaper and polish with the wax. Makes it smooth as, well, you know.
 I love it so much that I wish it was my kitchen. I really like the stone look on the laminate counter tops. (Again, imagine that the baseboard fronts are in place along the floor). Speaking of floor, do you like what I asked the flooring guys to do? I asked if they could randomly scatter a lighter tile among the dark ones without a geometric pattern. I like how it turned out.


By making over what was donated and keeping it from a landfill, this was a trash to treasure success. Combining it with new counter tops and flooring, this is a budget friendly makeover you can do it your kitchen too. Just be prepared for investing some time in the layers it takes to get a faux finish right.

My next project is taking some 80's 2x4 pine furniture that was donated and giving that a similar makeover to the cabinets. That will complete the eat-in area of the kitchen.


I'm linking this post to "Look What I Made Day" at Creations by Kara.Check out other great project ideas on her site.

I'm also linking up to "Best DIY Projects of September" on Beneath My Heart link party. 

Dark Glaze Faux Finish

Recently, I showed you how I faux finished two large cabinets in a white glaze. I got on a glazing roll and did some other furniture. This time, dark wood grain glaze. I have a set of end tables and lamps that we received as a wedding gift in 1989, and I decided it was time to update. Besides, the finish was in rough shape.
I think it looks a lot better on this picture that it did in person. The lamp has a brassy base that has become discolored. Again, making it look outdated.
There are faded and worn spots on top of this table.
I started off by priming everything in order to make sure the paint and glaze would stick without scraping right back off. I suggest a Zinsser or Kilz type of primer that is made for nonporous surfaces.
After the primer dried well, I coated both pieces (and the lamp base) with a base color. In this case, I chose a pecan colored latex satin paint because I wanted it to have reddish brown cast.
These doors are from another project, but they show what the base color looked like. Once the base coat dried, it was time to mix up the glaze. I used a DutchBoy glaze that had instructions for mixing 4 parts glaze with 1 part latex paint. I used a dark coffee colored satin latex paint for the glaze color. 

Once the glaze was mixed, I painted it on but made sure I worked only in small areas at a time so that it wouldn't begin to dry before I could wipe some off. Yes, I did mean to say wipe some off. Using a damp rag (a cotton cloth diaper type rag), I wiped off some of the glaze after I painted it on. 
If you wipe off too much, you can always add some back on with the brush. 
The wiping must be very light and gentle for this to work. Otherwise, you'll wipe too much off. Also, whenever possible, it's best to wipe with the grain since it will help add some new grain. 

The lighter areas on the finished door are the areas where I wiped off more with the damp rag.
Once the paint dried well, I coated the whole thing in a polyurethane to protect it and to bring out the shine. If you want to get rid of all brush stroke grooves, it's best to let everything dry well, then sand with a very find grain auto grit sand paper and do the poly coat. Then sand lightly again and coat with a Minwax paste finishing wax. This will give it the smoothest possible waterproof finish. While all of this isn't necessary, it does give your pieces a professional looking surface.

Finishing Touches For Cabinet Makeover

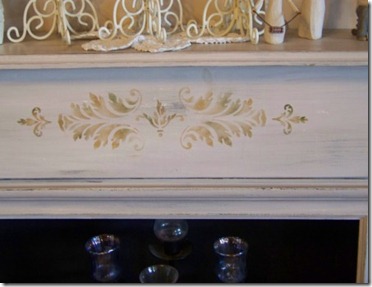
When I finished the cabinet makeover, I decided that I needed to add a few more touches. After all, if the men who live in my home thought it was primed rather than glazed to perfection, guests might think the same. Although, I'm sure most of my guests will have more imagination than my sons. Anyway, I decided to make the cabinets match my faux fireplace. 
So, I got out the stencils and stenciled the same design on the doors. There are 2 pieces to the stencil which gave flexibility to make it fit right. 
But that wasn't quite enough. I didn't want to put the old wooden knobs back on. Remember these?
So I headed for the home improvement store on a mission to find something the brought these cabinets into this decade. I chose a ring pull for the large cabinet. 
I chose smaller but similarly finished knobs for the smaller cabinet.
I did not drill these holes. They came uneven from the factory, can you believe it?
That wraps up this part of the makeover. Stay tuned for the makeover of those lamps and end tables from the WWYD feature. 

I've linked this post to:
Antiprocrastination Tuesday at New Nostalgia
 Transformation Tuesday at The Pumpkin Patch
Letting the Creative Juice Flow Linky Party at These Creative Juices


LinkWithin

Related Posts with Thumbnails