Content from this blog now appears on www.michellerayburn.com

t

More Antique Ski Ideas

I posted previously about what I did with my set of antique wooden skis, but I have another set that is just hanging on a wall in the game room. So I thought I'd browse around for some ideas for what I might be able to do with that set and then share those ideas with you.


This photo from the Orvis UK catalog gives us a great idea!

HGTV has many ideas for vintage skis and more modern ones in their trash to treasure files. Here's a headboard made from old downhill skis. Other files on the site include a candle holder and a ski rack made from skis.


How about a table?


Or how about using them to make a shelf?

Since I don't want to destroy my old skis, I'll keep looking for ideas. But these offer some great inspiration! And here are some additional ways to use those skis for Christmas decoration.


 From the Wisdom River Gallery Site


Christmas Skis

I inherited my husband's grandfather's old wooden skis when I found them up in the pole shed and rescued them.I had to scrub the bird doo-doo off of them but they survived.  Since my house isn't particularly woodsy cabin in style, I wasn't sure what to do with them, but they look terrific leaning next to my faux fireplace with some greens and lights for decoration.
100_3683
I used artificial greens, a short string of 20 lights, artificial berries, and some rusty star metal garland that I picked up at a garage sale to decorate the skis. Everything is held on with a light gauge floral wire so it can easily be removed with no damage to the antiques. 100_4175
100_4198
At Christmas, I love to decorate my faux fireplace! I built the “fireplace” out of an old picture frame and scrap lumber we had around. Sometime, I’ll feature the fireplace on T2T. But back to the skis…

I’ve seen some other neat ideas with old skis on the web. If you’ve found a unique use for them, please, do share!
Merry Christmas!

I'm linking up this post to:
A Soft Place to Land - DIY Day

Christmasification of Your Trash

I've been swamped with Christmas preparations (I bet you have too), but I wanted to take time to post a new trash to treasure idea. It's just as fun to transform your T2T decorations into Christmas decorations as it is to transform them from trash to treasure!

Electric Lamp Unplugged
I found this stand lamp at a thrift sale but the wiring was in terrible shape and I was afraid of using it as an electric lamp. It was also missing all of the glass parts and it has the old cardboard tubes around the bases of the sockets which seems a little unsafe. I know, candles aren't 100% safe either! But somehow, they seemed like a better idea. If you've seen old lamps like this, you know that it had a larger glass globe on top and some sort of smaller glass parts where each of the three bulbs insert.

I decided to turn it into a candelabra, so I cut the frayed electric cord off at the base and inserted glass pegged votive cups in each of the sockets. The top was a little more of a challenge, but I found a hurricane glass at another yard sale and set a clear flowerpot votive inside that. I know, it's a lot of pieces and parts, but I'm a junkie and I like hunting for parts. I finished it off by slipping a flower candle ring around the stem (it's a pillar candle ring). I can burn tealights or votives in the holders.

Here is what the candelabra looks like.


Now for the holiday fun! When I got out the Christmas decorations this year, I decided to remove the year-round decorations and add some Christmas ones. I wrapped a piece of pine garland around the stem and added a couple of bows.

I also added a few silver Christmas tree ornaments and changed out the candles for red ones.

There you have it! The Christmasification of some of my junk. 

I'm linking up this week to:
Reinvented's Trash to Treasure Tuesday
The Thrifty Home's Penny Pinching Party 
The Shabby Nest -Frugal Friday Link Party 
A Soft Place to Land's DIY Day 
The Shabby Chic Cottage Transformation Thursday

Family Photo Gift Ideas

I love crafting. So today, I'm featuring something that isn't trash to treasure. Some of the ideas could easily use recycled objects, but I just felt like sharing some Christmas gift ideas with you. I've been working on homemade Christmas gifts all weekend but I'm not telling what I made, just in case the recipients happen to be readers. As we approach Christmas and we think about what is most important to us, I think of the people in my family. And as I think of the people in my family, I think of photos and memories captured on film. I take a lot of pictures!

One of the most precious gifts we can give to someone else is a photo that brings hearts together across the miles. So today, as I break from my usual decorating ideas, here are some photo gift ideas that I found on the web and wanted to share with you. Maybe you'll bless someone dear to you with a photo gift this season.

Christmas Gift Ideas that Touch the Heart
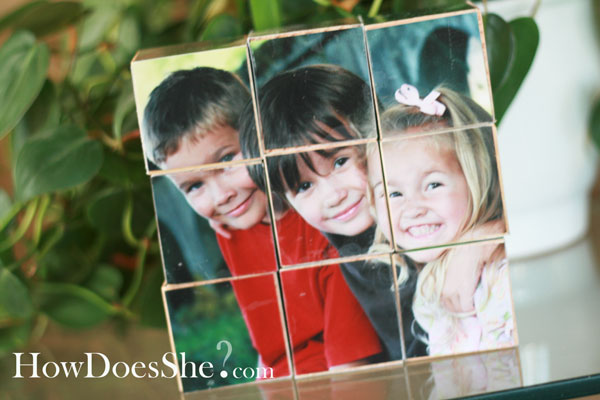
Photo Block Puzzle
At HowDoesShe.com, these photo blocks caught my eye. Your photo size will depend on your block size and you can vary it by having just 4 blocks too. Just remember, you'll need photos for 6 sides! It's easy to print them on a laser printer and decoupage them onto the blocks. Or if you use an inkjet printer, be a little more careful with your gluing.


Photo by www.howdoesshe.com
Using a trimmer or paper cutter, cut, your photo into squares and glue it on. Then flip the blocks to a blank side and do the same with another photo. Keep going until all sides are covered. You've now created an easy photo puzzle!

Photo Booklet
This photo booklet from Family Fun Magazine is easy to create and has printable instructions for you.

  Photo from Family Fun Magazine


Baby Mobile
A baby mobile made from recycled used Cd's and colorful paper with family photos at Parents Magazine's site.

Photo from Parent's Magazine website.

Unique Photo Blocks and Books and Clocks

Better Homes and Gardens offers these unique scraps of wall molding that have been turned into photo displays.

From Better Homes and Gardens

They've also recycled old books into a photo display.
Photo from Better Homes and Gardens

And finally, this photo clock from Better Homes. It's easy to pop the front off most low-cost clocks. Just  carefully take the hands off the clock setting them aside in the order you removed them. Then remove the paper insert for a template. If it isn't removable, trace the clock to get the closest fit possible. lightly tack the photo in place and replace the clock hands. So easy!


Photo from Better Homes and Gardens

What photo gift ideas can you share? Post a link to the site in the comments below. With these ideas, you'll be giving homemade personalized gifts this season with little effort.

Light Bulb Snowmen

I'm back! I've recovered a good portion of my data from the hard drive crash and I'm getting things back on track. Thanks for your patience during my week off. Today, I want to introduce you to some chilly little recycled friends. 

Light Bulb Snowmen

Level of Difficulty: Complicated steps and materials
Time: Not a short project because of dry time and detailed steps

I taught a class on these cute little snowmen recently. I had found the idea on About.com and then modified it to fit my supplies. Well I modified it because I never follow directions. And, for the class, I needed something that would be dry enough to finish in an hour or two, so traditional paper mache wouldn't work. It's the perfect way to recycle some light bulbs and make Christmas gifts. These little guys can be used as stand-up figures or can be tied or wired to hang on the Christmas tree, your choice.


Step One  


Supplies for Step One:
  • plaster of paris
  • water
  • measuring cup or disposable cup to scoop plaster
  • disposable bowl or pie tin and a plastic fork or spoon
  • small piece of plastic wrap or foil for setting wet snowman on.
  • burned out light bulbs in different sizes
  • paper towel
  • newpaper to protect work surface
  • disposable gloves
To make my snowmen, I used plaster of paris and paper towels. First, I tore the white paper towels, (a good quality quilted Bounty towel) and tore it into pieces approximately 2 inches by 2 inches. They can be random and ragged. It takes around one towel per light bulb snowman. 

Next, I mixed up a small amount of plaster of paris in a disposable bowl. It is important that yo do not begin mixing until you are ready to go because it begins the chemical process very quickly and you have little time to work. That means, get your surface ready with some sort of protection like newspaper and a something to set your snowmen on to dry.Have a pair of disposable gloves ready too. For mixing, it works best to put the plaster of paris power into the bowl and then add water until it is the consistency of pancake batter. Stir quickly!

Then, very quickly, dip the paper towel pieces into the plaster mix. It's only necessary to dip one side. Then put the dipped side down on the light bulb and smooth out. Keep working quickly as the mixture will begin to harden soon. Keep dipping and smoothing without trying to be too precise. If you want your snowman to stand up, then you'll need to put a blob of the paper towel/plaster stuff on the bottom and then smoosh it down on your work surface to make it stand.

Keep your paper mache layer as thin as possible. 


Your gloves will begin to get caked with the mixture and it will get more difficult to dip the towels as it begins to set. The most light bulbs I could get done per batch was 1-2. Any more and the mixture was too hard.


When you begin a new batch to do more light bulbs, be sure that your bowl and equipment is fresh as a small amount of hardened plaster will speed up the hardening of the next batch. Bummer. I learned it the hard way.


I also learned once the hard way that you cannot wash plaster of paris bowls in the sink. It will harden in your drain and someone, like an understanding husband, will need to take apart the plumbing to chisel it out. 


So, we've completed the plastering step.

Now, if you think this plaster of paris stuff sounds difficult and you have extra days to allow your critters to dry, then I would suggest the old newspaper, glue, paper mache method. Much more kid-friendly if you're doing this with children too!


Step Two

Supplies:
  • Tacky glue or hot glue
  • scraps of fabric (felt, fleece, quilting cotton,)
  • small sticks
  • black paint or marker
  • buttons
  • White paint
If you used plaster of paris, it isn't really necessary to paint your snowment since they are already snowy white. Although, it can let off a chalky film, and they aren't waterproof, so you may wish to seal them with white paint. If you did the traditional paper mache, you'll need to paint them for sure.

Next, it's time to embellish. If you visit the About.com instructions, you'll see how they made the hat. I did mine with a piece that was 3x4 inches and I used fleece. It's all glue, no sew. You basically fold a brim on the long side, then form it into a tube overlapping the short ends with a little bit of glue. Then you tie the top and snip it to look like a pom pom. I used a little glue to keep it on the snowman. Side note: if your plaster is a little damp, hot glue will not stick, but tacky glue will work wonderfully since it is water based.

Keep embellishing by adding buttons, stick arms and a scarf. My noses were made from orange fleece cut in a tiny triangle. You could use craft foam too. The arms stayed on best if I used a pencil to make a little hole where I was going to glue an arm.

To dab on the eyes and mouth, if you don't have a paint pen, just dip the tip of a pencil into craft paint and dab it on in a row. You can sharpen the pencil again later and get the paint off.

I hope you have fun with your snowmen! My favorite light bulbs to use are my bathroom vanity ones because they are shorter and rounder. But the taller utility bulbs and regular incandescent bulbs make a fun little family of different sizes.
Happy Recycling!


See this post on tour at these blogs:

Today's Creative Blog - Get Your Craft On


Reinvented - Trash to Treasure Tuesday
http://www.thethriftyhome.com
The Thrifty Home - Penny Pinching Party
The Inspired Room Holiday Link Party


ASPTL


DIY Day at A Soft Place to Land


2nd Time Around Tuesday at A Picture is Worth 1000 Words

Blessed Computers and Borrowed Ideas

My laptop crashed this week, the laptop that contains everything. My pictures. My data. My kidneys. Ok, well not the kidneys. But it feels like a part of my body is missing!  It's in for repair and I'm hoping to have it back by Friday. In the meantime, the regularTrash to Treasure is on a little break until I get my material back. Yes, I know. External hard drive. I ordered one and it's on the way. It would have saved me some panic this week.

And while I'm waiting for my data to come home, I'm dreaming up some new ideas for T2T features.  Can't wait to share! For this week, I'm sharing some ideas that come from my favorite T2T decorators and some I've just discovered.

Kara shares this made-over pedestal bowl this week at Creations by Kara.

 Photo by Creations by Kara
Or how about these totally cool fabric scrap Christmas trees from Ashley at All Things Heart and Home?

 Photo by All Things Heart and Home
And finally, here's a classy hutch makeover from Studio JRU 


 Photos by Studio JRU


Thanks for the inspiration everyone! 

Michelle

11/13 Blog Hop #4


It's Trash to Treasure Follow Friday #4
"T2Tff"

What is your favorite link or site of the week?  Link up and tell us what's hot in the Trash to Treasure world this week.You'll have until Sunday evening to post your links.Show us your favorite post of the week, your latest project, or a trash to treasure feature.


Here's one I found this week. A Soft Place to Land just moved to a new page on the web and Kimba has a great idea for a low-cost Thanksgiving decoration, a thankful tree. See the directions for this tree on A Soft Place to Land. 
 
Photo belongs to Kimba at A Soft Place to Land
Thanks for the inspiration, Kimba!


Blog Hop guidelines:
Trash to Treasure Decorating1-Add a permalink to your specific post. Be sure to check that the link works after you post.


2-Add a short title for your post. This could be your name or project title if you'd like.


3- Link back to this post from your blog, or send a link to your facebook friends or tweeps (mention @trash2treas).


4-Check out the links and leave some comments on the sites you enjoy.


That's all there is to it! I can't wait to see your links and ideas. Never used MckLinky? It's super easy. You don't need an account or any software. Just click on "you are next" below and type a title for the post (or your name) and add a link to the location on the web. It's that simple!

MckLinky Blog Hop


LinkWithin

Related Posts with Thumbnails