Content from this blog now appears on www.michellerayburn.com

t

French Door Project

I saw this project on one of the link parties I posted on last week and just had to share the link with you. Emily at Four Flowers took an old French door and turned it into a fabulous mirror. On the blog, Emily shares step by step how she refinished and repurposed. She used a spray paint product that I hadn't heard of for the mirror...you'll want to check out her brand new blog to see what it was.
She went from this:

To this:


Both photos linked from Emily's blog

Faux Fireplace

I had always wanted a fireplace, but never owned a house with one. I’d also considered just putting up a mantel for ambience, and had seen mantels at salvage shops that were really cool, but none ever fit my budget. So, I decided to build one out of scrap lumber.
I happen to like power tools. A lot. So one evening, I went down in my workshop and scavenged through my scraps. Among the treasures I had stored away for future use (packrats triumph sometimes) I found a large old picture frame. It was the perfect size for the opening to a mantel.  Using that as my guide for size, I designed my mantel around it. Since it wasn’t going to be a functioning fireplace, thought it would be much more functional to make shelves on either side of the opening to display tchotchkes. 100_4432
I insisted on building it without any help from my husband, which means it isn’t perfectly square, plumb, or whatever precision is called. But that’s okay. I like it!
When we moved, I took my “fireplace” with me, the benefit of a faux fireplace.
I left the top unfastened and created a secret compartment inside the top which is perfect for hiding seasonal candles. For the finish, I painted it black, then painted a winter white over it allowing the black to streak through. I added some beige dry-brushing and let it all dry. Then I sanded the edges and random places to allow more black to show through. I used the router on the edges before assembling in order to give it more interest.100_4436
I stenciled on the front to look like carving. I painted the inside of the opening black and use a piece of uncut matting board (for picture framing) as the backing. After the black dried inside, I roughly painted a fire grate on the inside. 100_4435
100_4434  I have a couple of jars with tealights inside for when I want it to look like the fire is lit. The only way to make it safe is to have the tealights in tall jars! Finally, I added two pieces of marble that just stand freely on the floor in front of the mantel (purchased from building supply store). This makes it look more authentic too. 100_4438
For a long time, I searched for the right thing to hang over my mantel. Then I found this antique beveled mirror at a garage sale for less than $20. It’s HEAVY. I had to anchor it into the studs and it hangs by a heavy chain, but it was just the right thing. And even through the cherry color of the frame doesn’t match the mantel, it ties in with the built-in cabinets in the room.100_4437 I topped off the mirror with a garland of berries and rusty stars. 100_4439  I love projects that cost almost nothing, but give years of priceless enjoyment! By the way, my greatest compliment about this project was when our landlord stopped by for a routine inspection and suddenly his eyes widened. “When did you install a fireplace?” Lest he have a heart attack or evict us, I quickly reassured him that it was a free-standing piece of art. Hee, hee~


100_4433   
This post is on tour at these places on the web:


Let it Snow- Recycled Snowflakes

Snowflakes from Recycled Dryer Sheets

I received my Quilting Daily e-mail newsletter that had a trash to treasure project that I just had to share today. Using used dryer sheets, Quilting Arts contributor, Natalya Aikens has created these snowflakes. Check out the full post on the Quilting Arts website for a step by step tutorial to recycle your own fabric softener sheets.

 Photo linked from Quilting Arts website


This would be a fun project for both children and adults. And even if you don't create the whole recycled paper tube display, these snowflakes would look pretty in any winter display, or hanging from fish line. 

You'll find links at the end of the post for other recycling ideas too. Let it snow!


More Antique Ski Ideas

I posted previously about what I did with my set of antique wooden skis, but I have another set that is just hanging on a wall in the game room. So I thought I'd browse around for some ideas for what I might be able to do with that set and then share those ideas with you.


This photo from the Orvis UK catalog gives us a great idea!

HGTV has many ideas for vintage skis and more modern ones in their trash to treasure files. Here's a headboard made from old downhill skis. Other files on the site include a candle holder and a ski rack made from skis.


How about a table?


Or how about using them to make a shelf?

Since I don't want to destroy my old skis, I'll keep looking for ideas. But these offer some great inspiration! And here are some additional ways to use those skis for Christmas decoration.


 From the Wisdom River Gallery Site


Christmas Skis

I inherited my husband's grandfather's old wooden skis when I found them up in the pole shed and rescued them.I had to scrub the bird doo-doo off of them but they survived.  Since my house isn't particularly woodsy cabin in style, I wasn't sure what to do with them, but they look terrific leaning next to my faux fireplace with some greens and lights for decoration.
100_3683
I used artificial greens, a short string of 20 lights, artificial berries, and some rusty star metal garland that I picked up at a garage sale to decorate the skis. Everything is held on with a light gauge floral wire so it can easily be removed with no damage to the antiques. 100_4175
100_4198
At Christmas, I love to decorate my faux fireplace! I built the “fireplace” out of an old picture frame and scrap lumber we had around. Sometime, I’ll feature the fireplace on T2T. But back to the skis…

I’ve seen some other neat ideas with old skis on the web. If you’ve found a unique use for them, please, do share!
Merry Christmas!

I'm linking up this post to:
A Soft Place to Land - DIY Day

Christmasification of Your Trash

I've been swamped with Christmas preparations (I bet you have too), but I wanted to take time to post a new trash to treasure idea. It's just as fun to transform your T2T decorations into Christmas decorations as it is to transform them from trash to treasure!

Electric Lamp Unplugged
I found this stand lamp at a thrift sale but the wiring was in terrible shape and I was afraid of using it as an electric lamp. It was also missing all of the glass parts and it has the old cardboard tubes around the bases of the sockets which seems a little unsafe. I know, candles aren't 100% safe either! But somehow, they seemed like a better idea. If you've seen old lamps like this, you know that it had a larger glass globe on top and some sort of smaller glass parts where each of the three bulbs insert.

I decided to turn it into a candelabra, so I cut the frayed electric cord off at the base and inserted glass pegged votive cups in each of the sockets. The top was a little more of a challenge, but I found a hurricane glass at another yard sale and set a clear flowerpot votive inside that. I know, it's a lot of pieces and parts, but I'm a junkie and I like hunting for parts. I finished it off by slipping a flower candle ring around the stem (it's a pillar candle ring). I can burn tealights or votives in the holders.

Here is what the candelabra looks like.


Now for the holiday fun! When I got out the Christmas decorations this year, I decided to remove the year-round decorations and add some Christmas ones. I wrapped a piece of pine garland around the stem and added a couple of bows.

I also added a few silver Christmas tree ornaments and changed out the candles for red ones.

There you have it! The Christmasification of some of my junk. 

I'm linking up this week to:
Reinvented's Trash to Treasure Tuesday
The Thrifty Home's Penny Pinching Party 
The Shabby Nest -Frugal Friday Link Party 
A Soft Place to Land's DIY Day 
The Shabby Chic Cottage Transformation Thursday

Family Photo Gift Ideas

I love crafting. So today, I'm featuring something that isn't trash to treasure. Some of the ideas could easily use recycled objects, but I just felt like sharing some Christmas gift ideas with you. I've been working on homemade Christmas gifts all weekend but I'm not telling what I made, just in case the recipients happen to be readers. As we approach Christmas and we think about what is most important to us, I think of the people in my family. And as I think of the people in my family, I think of photos and memories captured on film. I take a lot of pictures!

One of the most precious gifts we can give to someone else is a photo that brings hearts together across the miles. So today, as I break from my usual decorating ideas, here are some photo gift ideas that I found on the web and wanted to share with you. Maybe you'll bless someone dear to you with a photo gift this season.

Christmas Gift Ideas that Touch the Heart
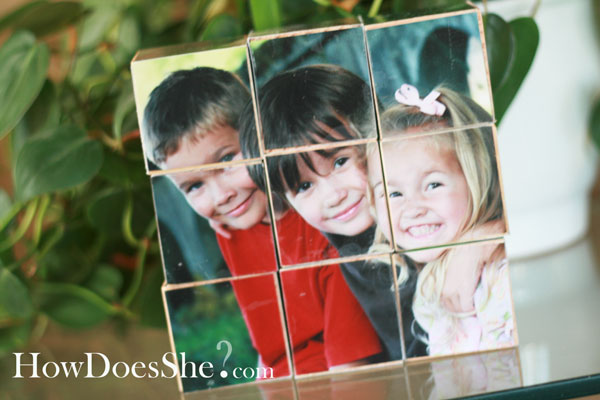
Photo Block Puzzle
At HowDoesShe.com, these photo blocks caught my eye. Your photo size will depend on your block size and you can vary it by having just 4 blocks too. Just remember, you'll need photos for 6 sides! It's easy to print them on a laser printer and decoupage them onto the blocks. Or if you use an inkjet printer, be a little more careful with your gluing.


Photo by www.howdoesshe.com
Using a trimmer or paper cutter, cut, your photo into squares and glue it on. Then flip the blocks to a blank side and do the same with another photo. Keep going until all sides are covered. You've now created an easy photo puzzle!

Photo Booklet
This photo booklet from Family Fun Magazine is easy to create and has printable instructions for you.

  Photo from Family Fun Magazine


Baby Mobile
A baby mobile made from recycled used Cd's and colorful paper with family photos at Parents Magazine's site.

Photo from Parent's Magazine website.

Unique Photo Blocks and Books and Clocks

Better Homes and Gardens offers these unique scraps of wall molding that have been turned into photo displays.

From Better Homes and Gardens

They've also recycled old books into a photo display.
Photo from Better Homes and Gardens

And finally, this photo clock from Better Homes. It's easy to pop the front off most low-cost clocks. Just  carefully take the hands off the clock setting them aside in the order you removed them. Then remove the paper insert for a template. If it isn't removable, trace the clock to get the closest fit possible. lightly tack the photo in place and replace the clock hands. So easy!


Photo from Better Homes and Gardens

What photo gift ideas can you share? Post a link to the site in the comments below. With these ideas, you'll be giving homemade personalized gifts this season with little effort.

LinkWithin

Related Posts with Thumbnails