Content from this blog now appears on www.michellerayburn.com

t

Light Bulb Snowmen

I'm back! I've recovered a good portion of my data from the hard drive crash and I'm getting things back on track. Thanks for your patience during my week off. Today, I want to introduce you to some chilly little recycled friends. 

Light Bulb Snowmen

Level of Difficulty: Complicated steps and materials
Time: Not a short project because of dry time and detailed steps

I taught a class on these cute little snowmen recently. I had found the idea on About.com and then modified it to fit my supplies. Well I modified it because I never follow directions. And, for the class, I needed something that would be dry enough to finish in an hour or two, so traditional paper mache wouldn't work. It's the perfect way to recycle some light bulbs and make Christmas gifts. These little guys can be used as stand-up figures or can be tied or wired to hang on the Christmas tree, your choice.


Step One  


Supplies for Step One:
  • plaster of paris
  • water
  • measuring cup or disposable cup to scoop plaster
  • disposable bowl or pie tin and a plastic fork or spoon
  • small piece of plastic wrap or foil for setting wet snowman on.
  • burned out light bulbs in different sizes
  • paper towel
  • newpaper to protect work surface
  • disposable gloves
To make my snowmen, I used plaster of paris and paper towels. First, I tore the white paper towels, (a good quality quilted Bounty towel) and tore it into pieces approximately 2 inches by 2 inches. They can be random and ragged. It takes around one towel per light bulb snowman. 

Next, I mixed up a small amount of plaster of paris in a disposable bowl. It is important that yo do not begin mixing until you are ready to go because it begins the chemical process very quickly and you have little time to work. That means, get your surface ready with some sort of protection like newspaper and a something to set your snowmen on to dry.Have a pair of disposable gloves ready too. For mixing, it works best to put the plaster of paris power into the bowl and then add water until it is the consistency of pancake batter. Stir quickly!

Then, very quickly, dip the paper towel pieces into the plaster mix. It's only necessary to dip one side. Then put the dipped side down on the light bulb and smooth out. Keep working quickly as the mixture will begin to harden soon. Keep dipping and smoothing without trying to be too precise. If you want your snowman to stand up, then you'll need to put a blob of the paper towel/plaster stuff on the bottom and then smoosh it down on your work surface to make it stand.

Keep your paper mache layer as thin as possible. 


Your gloves will begin to get caked with the mixture and it will get more difficult to dip the towels as it begins to set. The most light bulbs I could get done per batch was 1-2. Any more and the mixture was too hard.


When you begin a new batch to do more light bulbs, be sure that your bowl and equipment is fresh as a small amount of hardened plaster will speed up the hardening of the next batch. Bummer. I learned it the hard way.


I also learned once the hard way that you cannot wash plaster of paris bowls in the sink. It will harden in your drain and someone, like an understanding husband, will need to take apart the plumbing to chisel it out. 


So, we've completed the plastering step.

Now, if you think this plaster of paris stuff sounds difficult and you have extra days to allow your critters to dry, then I would suggest the old newspaper, glue, paper mache method. Much more kid-friendly if you're doing this with children too!


Step Two

Supplies:
  • Tacky glue or hot glue
  • scraps of fabric (felt, fleece, quilting cotton,)
  • small sticks
  • black paint or marker
  • buttons
  • White paint
If you used plaster of paris, it isn't really necessary to paint your snowment since they are already snowy white. Although, it can let off a chalky film, and they aren't waterproof, so you may wish to seal them with white paint. If you did the traditional paper mache, you'll need to paint them for sure.

Next, it's time to embellish. If you visit the About.com instructions, you'll see how they made the hat. I did mine with a piece that was 3x4 inches and I used fleece. It's all glue, no sew. You basically fold a brim on the long side, then form it into a tube overlapping the short ends with a little bit of glue. Then you tie the top and snip it to look like a pom pom. I used a little glue to keep it on the snowman. Side note: if your plaster is a little damp, hot glue will not stick, but tacky glue will work wonderfully since it is water based.

Keep embellishing by adding buttons, stick arms and a scarf. My noses were made from orange fleece cut in a tiny triangle. You could use craft foam too. The arms stayed on best if I used a pencil to make a little hole where I was going to glue an arm.

To dab on the eyes and mouth, if you don't have a paint pen, just dip the tip of a pencil into craft paint and dab it on in a row. You can sharpen the pencil again later and get the paint off.

I hope you have fun with your snowmen! My favorite light bulbs to use are my bathroom vanity ones because they are shorter and rounder. But the taller utility bulbs and regular incandescent bulbs make a fun little family of different sizes.
Happy Recycling!


See this post on tour at these blogs:

Today's Creative Blog - Get Your Craft On


Reinvented - Trash to Treasure Tuesday
http://www.thethriftyhome.com
The Thrifty Home - Penny Pinching Party
The Inspired Room Holiday Link Party


ASPTL


DIY Day at A Soft Place to Land


2nd Time Around Tuesday at A Picture is Worth 1000 Words

Blessed Computers and Borrowed Ideas

My laptop crashed this week, the laptop that contains everything. My pictures. My data. My kidneys. Ok, well not the kidneys. But it feels like a part of my body is missing!  It's in for repair and I'm hoping to have it back by Friday. In the meantime, the regularTrash to Treasure is on a little break until I get my material back. Yes, I know. External hard drive. I ordered one and it's on the way. It would have saved me some panic this week.

And while I'm waiting for my data to come home, I'm dreaming up some new ideas for T2T features.  Can't wait to share! For this week, I'm sharing some ideas that come from my favorite T2T decorators and some I've just discovered.

Kara shares this made-over pedestal bowl this week at Creations by Kara.

 Photo by Creations by Kara
Or how about these totally cool fabric scrap Christmas trees from Ashley at All Things Heart and Home?

 Photo by All Things Heart and Home
And finally, here's a classy hutch makeover from Studio JRU 


 Photos by Studio JRU


Thanks for the inspiration everyone! 

Michelle

11/13 Blog Hop #4


It's Trash to Treasure Follow Friday #4
"T2Tff"

What is your favorite link or site of the week?  Link up and tell us what's hot in the Trash to Treasure world this week.You'll have until Sunday evening to post your links.Show us your favorite post of the week, your latest project, or a trash to treasure feature.


Here's one I found this week. A Soft Place to Land just moved to a new page on the web and Kimba has a great idea for a low-cost Thanksgiving decoration, a thankful tree. See the directions for this tree on A Soft Place to Land
 
Photo belongs to Kimba at A Soft Place to Land
Thanks for the inspiration, Kimba!


Blog Hop guidelines:
Trash to Treasure Decorating1-Add a permalink to your specific post. Be sure to check that the link works after you post.


2-Add a short title for your post. This could be your name or project title if you'd like.


3- Link back to this post from your blog, or send a link to your facebook friends or tweeps (mention @trash2treas).


4-Check out the links and leave some comments on the sites you enjoy.


That's all there is to it! I can't wait to see your links and ideas. Never used MckLinky? It's super easy. You don't need an account or any software. Just click on "you are next" below and type a title for the post (or your name) and add a link to the location on the web. It's that simple!

MckLinky Blog Hop


Pottery Barn vs Thrift Store

Pottery Barn 3-Tier Server, Goodwill Style

I taught a craft class this past weekend and I thought I'd share the project on the blog. Since my budget fits Goodwill or flea markets much better than it fits the price of the treasures in the Pottery Barn catalog, it's necessary to figure out how to achieve the look at, well, 1/8th of the price if ever possible.

This 3-tier serving platter retails for $45 on the Pottery Barn website:

Photo from Pottery Barn catalog

Here's my knock-off version of the 3-tier platter:

I purchased the plates (the middle layer is actually a shallow bowl) for 75 cents each at the Goodwill store. Actually, they came to more like 63 cents each because I was able to purchase an entire set at 50% off if I bought it by the box. They were a white with a gold rim around the edge.

The plates are connected by taper candle holders which were available for $1 at my local dollar tree, and I found a few with 1/2 off tags at the thrift shop.

I used an all purpose cement to glue the layers together. I looked for a glue that was for porcelain or ceramic and for one that would dry in a quick amount of time after contact. I learned that hard way that super glue isn't the best since it clouds up, and my sample had a white film inside the candle holders, but it did hold well! At any rate,  you'll want to look for a glue that dries clear because that will prevent the clouding problem. The glue I chose was just $1 per tube in the paint/hardware department and it also claimed to be dishwasher safe, although I don't plan to put something as clunky as this into the dishwasher. Another friend made one this week and she used epoxy and said it worked well, so you have several glue options.

To assemble your plates, be sure all layers are clean and dry. Then layer by layer, glue around the rim of the candle holder (bottom or top) and stick them together. I eyeballed mine for being centered, but if you aren't sure your eyeballs are working right, you could measure and mark the centers.

I experimented a little with a clear plate and I liked that too! Instead of a plate on top, I glued on a candy dish on that one.


Total cost for the project, including glue--$4.89. That means it was 1/9th of the price of the Pottery Barn item. At more than $40 in savings, that's not too shabby!

This project is touring the web this week at:

Between Naps on the Porch Metamorphosis Monday
Reinvented's Trash to Treasure Tuesday
2nd Time Around Tuesday at A Picture is Worth 1000 Words
Just a Girl's "I Can Make That" Party
 DIY Day at A Soft Place to Land

The Inspired Room Beautiful Life Friday


11/6 Follow Friday Blog Hop


It's Follow Friday!
"T2Tff"


I almost forgot to post Follow Friday today! It's my 3rd Friday blog hop and I can't wait to see your posts.

What is your favorite link or site of the week?  Link up and tell us what's hot in the Trash to Treasure world this week.You'll have until Sunday evening to post your links.Show us your favorite post of the week, your latest project, or a trash to treasure feature.

Blog Hop guidelines:

Trash to Treasure Decorating1-Add a permalink to your specific post. Be sure to check that the link works after you post.

2-Add a short title for your post. This could be your name or project title if you'd like.

3- Link back to this post from your blog, or send a link to your facebook friends or tweeps (mention @trash2treas).

4-Check out the links and leave some comments on the sites you enjoy.

That's all there is to it! I can't wait to see your links and ideas. Never used MckLinky? It's super easy. You don't need an account or any software. Just click on "you are next" below and type a title for the post (or your name) and add a link to the location on the web. It's that simple!

MckLinky Blog Hop


Book Wreath

Recycle Those Broken Old Books

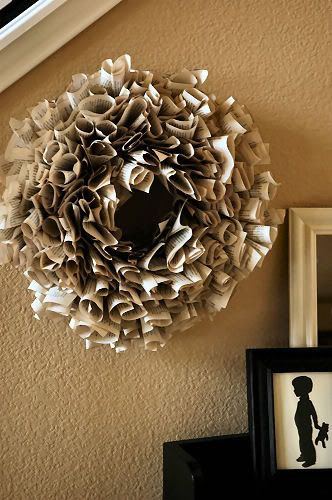
I saw this great project on another blog this week and I just have to share. If you've ever wondered what to do with an old book that is falling apart Living with Lindsay has a fantastic step-by-step tutorial on how to make this project:


Photo belongs to Lindsay from Living with Lindsay

Lindsay asks her librarian readers to avert their eyes as she takes a book and turns it into an attractive wreath. It's the ultimate trash to treasure! You'll find the supply list on Lindsay's site as well as a video tutorial.

Being a musician, I can see doing this with old sheet music as well. Or how about leftover wedding programs? Or an old cookbook...The possibilities are endless. What ideas come to mind for you?

Kitchen Night Light


Recycled Bottles 
 Maybe you've seen something similar to the night-lights I made for my kitchen. My sister-in-law has one on her counter made from a wine bottle. But like with any project I see, I can't help but try to come up with my own twist on it. 

The typical wine bottle with lights in it is made by drilling a hole in the back of the bottom of the bottle and stuffing lights into the bottle. However, I read stories on the Internet about how many bottles crack when someone tries to drill the hole. So I decided to make mine even simpler. I stuffed the lights in the top of the bottle.
 

In my picture, the bottle on the left is a wine bottle. I put a few colored glass marbles into the bottom of the bottle. To keep the bottle from shattering when you bounce marbles into it, tilt the bottle on its side, and let the marbles gently slide down the side. 

Then I stuffed in the lights. I used a string of 20 which is the perfect size for this project. This is the time of year when the lights start coming out and right after Christmas, I stocked up on them last year when they were 75% off. I left the tail of the light string sticking out the top of the bottle and then pressed the cork in place to hold the light cord securely. Then I tied raffia around the neck and wired on a cluster of artificial grapes. 

The green bottle on the right is an olive oil bottle. I put clear lights in it and they glow green. A sparkling cider bottle would look cool and so would any kind of vintage bottle.


So, my twist on the project is two-fold: skipping the drilling and using something other than a wine bottle. Think about the bottles you have around. I have a cool one from 1883 coffee flavoring that would make a good bottle for lights. I have also saved some clear bottles with the plan to make frosted designs, so I tried one out today. 

First, I got out the painters tape and a snowflake punch (from my scrapbook supplies). 

 The painters tape is easier to remove later than other kinds of tape. With the adhesive side of the tape facing down, I pressed the tape through my snowflake punch. This could also be done with laser cut stickers in place of the tape shapes. 

Then I stuck the tape snowflakes randomly on my clear bottle. 


 Next, I got out my frosted glass spray paint. This is sold wherever you buy spray paint. I used it to create privacy glass on my bathroom window and this was left over. I sprayed all over the bottle and let it dry (dries quickly). 


Then I carefully peeled off the blue tape snowflakes to reveal the pattern Make sure your paint has cured a little before you peel off the tape. I was a little hasty in peeling mine and it peeled off a little of the paint I wanted left on. 


Here is a picture of my finished frosted glass with the lights stuffed inside. I haven't accessorized the bottle yet, but you get the idea. To get the lights distributed, use the skinny handle of a wooden spoon or a sturdy skewer. Although the green cords from the lights are noticeable as shadows in the picture, the camera picked up more than what really showed. Still, I'm planning to add some marbles when I have a chance to get some because they help diffuse the light. 


 Just think, you could do so much with the frosted method!


Have you tried a similar project? How did yours differ from my method? Share your ideas in the comments below.  


I'm linking up with these sites:


And at Thrifty Decor Chick's Before and After Party 


A Picture is Worth 1000 Words 2nd Time Around Tuesday


DIY Day @ ASPTL 
DIY Day at A Soft Place to Land


Metamorphosis Monday at 
Between Naps on the Porch 
 
http://www.thethriftyhome.com 
 
 
The Thrifty Home Penny Pinching Party


Stop by these sites to see other great projects!


LinkWithin

Related Posts with Thumbnails